Low-Code Series - Part 2. The Minimal-Challenge
How to digitize processes without code
The first part of this small series of Low-Code articles dealt with the advantages of Low-Code and Workflow platforms. This episode is about a practical test. The goal is to implement the example formulated in the box Task step by step. DWKit offers a form builder for web and mobile apps, a complete workflow engine plus the ability to intervene with code at any point. This is important in order not to end up in a dead-end at some point.
The first design task is to define what data is collected across the workflow. These are the user who places the order, the date of the order, the name of the item and its estimated price. In addition, a field is provided for the status of the request, even if this is not mandatory. Later, the supplier and item number are specified. After creating the price request, the ID of the receipt and the receipt number are stored in a table. The table needs a primary key as well. With this, all data columns are specified.
A separate table can be created for this purpose, or a generic approach can be used. In the already existing table dwEntities in DWKit, the data previously defined via the interface is saved as a JSON object in the column container. The table also includes columns such as created on and changed on.
The advantage is obvious: you do not need any database rights to create another column. It is created on the fly. In a dynamic process where a column is needed from time to time, this makes sense and avoids having to version tables on the development and live servers.
However, this is also the biggest disadvantage. In addition, it is not possible to formulate views or evaluations because the fields are not in the database as columns, but as JSON objects in a field that is difficult to evaluate. As always, of course, anything is possible, it's just a question of effort.
Since the columns are manageable and it is not certain whether the data will still be needed for an evaluation later, the decision in the sample project is in favor of a separate table. If the columns change, the metadata can also be synchronized later. Listing 1 contains the SQL script.
Depending on the order value, the order is released either by the team leader or the department head. Once it is released, an email is sent to the employee. The ordering department selects the corresponding article (the materials are partly created in the ERP system, partly a one-off article is used) and supplier and creates a price request in the system.
Metadata and Data containers
In the first part of this series, it was discussed that the essence of low-code platforms is to keep information about data, forms, and processes in metadata. This enables a platform-independent description of the structure. Thus, one is not limited to SQL Server, Windows Forms, or HTML when modeling data or forms.
The platform also only knows the data for which metadata is provided. So if you want to work with a table, you have to create metadata for it. Providers for Oracle, MS SQL, or PostgreSQL are already integrated. Since the source code is available, any other data provider can also be included.
Before you do this, a general note on data management: DWKit has its own tables to manage the state of workflows or users, etc. One of them is the dwEntities table, which can store all data. The system that is to be interacted with - in this case an ERP system - also has its own database in which items et cetera are created. There are now two possibilities:
● Having all tables needed for the workflow engine in the same database as the ERP system, or
● connect the ERP database as an external database and create a new database to manage workflows.
DWKit accesses tables of the ERP system to display article data or suppliers, for example. This can also be done via API, in which case no external database needs to be created. To keep the example simple, only one database is used here and the table and queries for DWKit are integrated into the ERP database using the provided script. To be able to work with it, the metadata must be created. This is done automatically by synchronizing existing metadata with the subjacent database (Fig. 1).
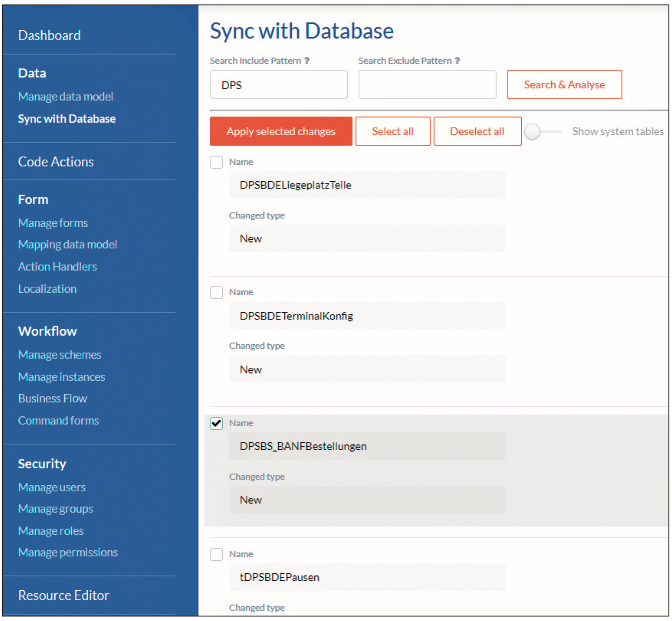
Fig. 1: Synchronising the database with the metadataSynchronization
All tables for which no metadata is yet available are suggested. If the metadata of a table differs from the table in the database, the system shows the differences (for example, the new entry_date column in the table) and you can include it in the metadata model individually. This may seem a bit inconvenient, but it makes working with the workflow easier, because only the required tables are visible, and also because the models may well differ.
It is important that a primary key is always defined - see Fig. 2. The platform currently can only handle a simple primary key, combined primary keys such as client and article_ID are not allowed.
It is also recommended to use a GUID (Globally Unique Identifier in SQL) because then this key can also be used as a key for the corresponding workflow. You will learn more about this later.
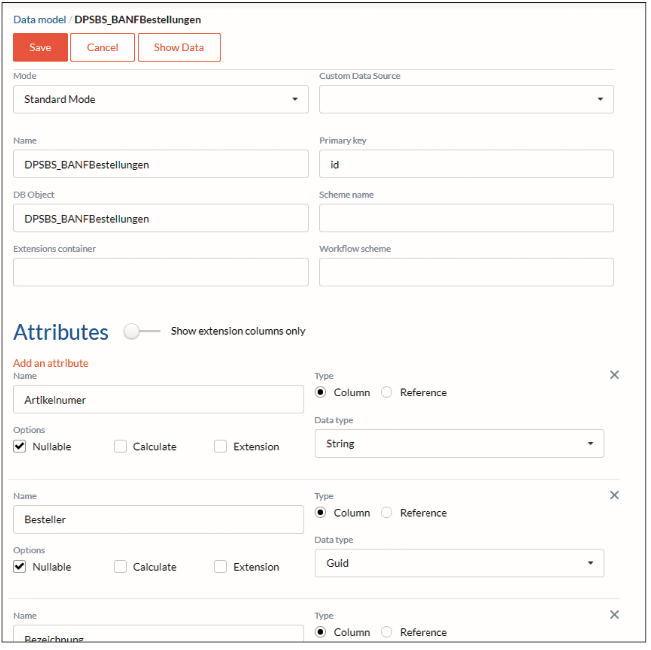
Fig. 2: Modifications to the tableMixed Mode
If there is a field in the table that can contain text (varchar, char, etc.), then it can be used as a container for JSON data. You can therefore create additional fields as "extension columns" without them having to be explicitly present as columns in the table. Tables that consist exclusively of such extension columns and are created completely generically in the table dwEntities are of the Simple Mode - compare Fig. 2. The data model for this example is a separate table and therefore has the Standard Mode. If the table is in another database, it has a different custom data source.
Time for UI
After the data structure is in place, the user interface is implemented. The tool is designed in such a way that there is an admin mode, which can be reached via [URL]/admin, and an application mode.
The user site is defined as a react-site (JSX) in the code and can be overwritten if necessary. By default, it consists of a header, a sidebar, a footer and the content area. This is certainly sufficient for 90 per cent of all cases.
All these areas (header, footer, etc.) are created as forms (Fig. 3), i.e. as metadata that can be edited. Either by adjusting the JSON files via a text editor or - which is much easier - via a user interface.
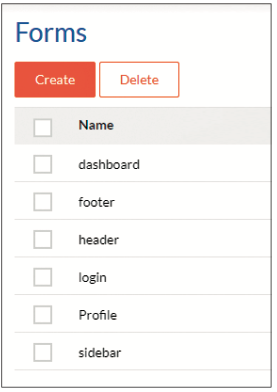
Fig. 3: The standard set of formsCustomising the menu
In the first step, the sidebar is to be extended by the new menu item New Order-Request.
The navigation to a form is simple: [URL]/form/[form_name]. Double-clicking on the form name (here: sidebar) takes you to the form editor (Fig. 4). The form consists of only one menu control. The edit button opens the editor for this control. Each control has its own editor, which is similar to the PropertyGrid in Visual Studio. The General tab contains the most important specific settings; for example, a new entry for a menu can be created here. Style contains fields for height, width, margins, CSS classes and so on. Other contains various JavaScript conditions for visibility, write protection etc. The Events tab will be looked at separately shortly.
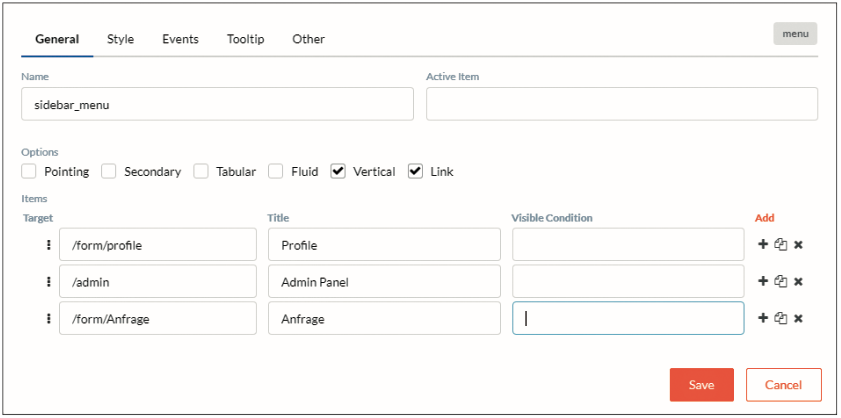
Fig. 4: The editor for a controlNow it's time for the design of the form request. In Fig. 5 you can see the form editor with the fields already created. The controls are moved from the toolbox to the fields using drag-and-drop.
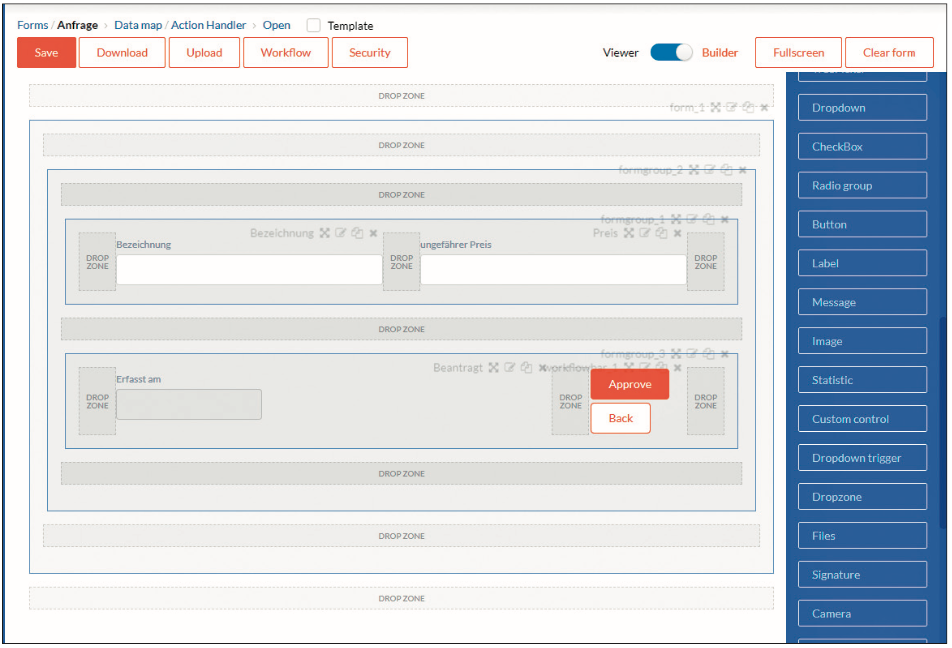
Fig. 5: The form editor. Controls are placed on the fields with drag-and-dropIt is advised to start with a form element into which a form group element is placed. Groups allow nesting of controls comparable to a StackPanel in Windows Presentation Foundation (WPF).
Each form has a data layer to which it is bound. If the names of the controls correspond to the columns in the data layer, they are automatically bound. A click on Data Map opens the editor for the data layer of the form (Fig. 6).
A table from the metadata (entity), an API endpoint (URL) or an action can be bound to the form. An action is an API endpoint that can be easily programmed in the framework. On the right side are all controls that are not assigned to a data source. Our controls were automatically assigned to the corresponding database fields because they have matching names.
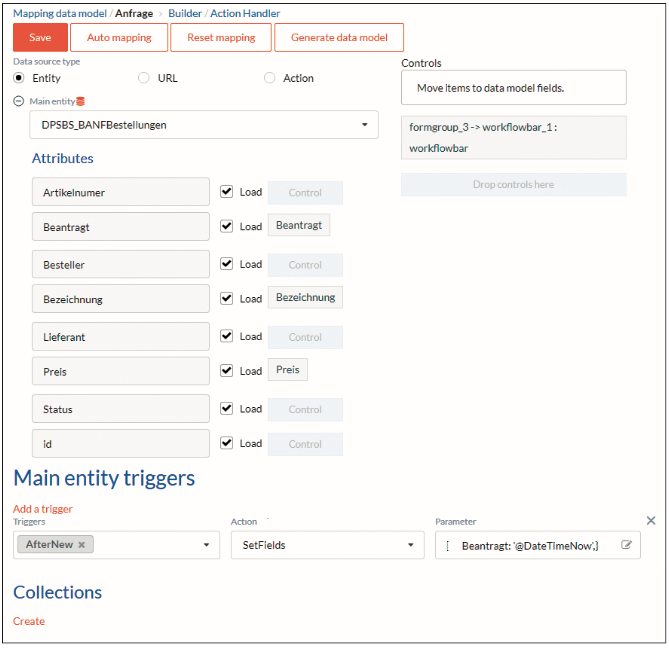
Fig. 6: Data mapping with the UIForm Triggers
Triggers can be defined for the form; these are events that are fired over the lifecycle of the form. In the example, after a new record is created, i.e. when the form is opened, the field Requested is set to the current date. Here, the major advantages and disadvantages of low-code platforms become clear: you have to learn a new language and this requires time to familiarise yourself with it. If you have mastered the language and the language fits the requirements, you can progress very quickly. However, if required functions are missing, a lot has to be developed around the existing functions.
Back to the form and the data binding. Further sub-tables (master/detail) can be displayed. To do this, you create a collection, for example, a table that contains the history of the order, and bind a data grid to the collection. And again, the advantage of Convention over Configuration becomes visible: If the sub-table has the main entity as a foreign key, it is automatically filtered, so only the entries of this order are displayed.
Many little "aha" effects arise when working with low-code platforms. For this, you have to build trust. Because a lot of things cannot be debugged or seen as code. This means a certain loss of control for every developer. However, as soon as you get to know these nice little functions and trust them, you don't want to do without them.
Developing customer-oriented
Is it a developer's or rather a consultant's job to build an application? That surely varies from case to case, but a certain division of tasks makes sense here. A consultant who is familiar with the system can achieve a lot in a customer-oriented way without great developer know-how, but with a certain basic understanding (that @ can be the beginning of a variable) and shorten round trips to the development department. The tasks of a developer lie in developing their own JavaScript functions or API endpoints for higher demands, which the consultant can fall back on.
Step by step
The workflow begins with the form. A workflow is a possible path through different stages. The path is characterised by transitions that take place automatically or are deliberately triggered by commands. Fig. 7 shows the simplest conceivable workflow for the task. Someone requests something - technically: someone triggers the command Request and the status changes from New to Requested. This is followed by a transition that happens automatically, it is automatically rejected.
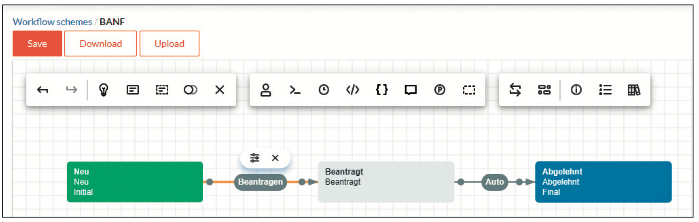
Fig. 7: The most basic workflow for the given taskIf you now bind the form to the workflow (in the properties of the form), then the following happens:
The workflow is at the beginning. It is analysed which transitions there are from the beginning to the next step and which commands these are. Here there is only the command Request. At this point, the workflow only has Request as a list of possible commands. In Fig. 6 we see that there is a control of the type WorkflowBar on the form. In the design view, it has the commands approve and back. But when the form is opened, it will contain a Request button.
The control dynamically draws the list of possible commands from the workflow definition. When the button is clicked, what happens is what is stored in Events as action or actions. Do you remember the Events tab in the control? Fig. 8 shows which events are executed. There are several actions already created that can be extended at any time with your own actions. In the example here, there are only predefined actions:
- Validate checks, depending on the settings in the control, whether the control is valid, for example, whether all required fields are filled. Save creates a new record in the table defined in the mapping. A new GUID is assigned as the ID. Since a workflow is stored with the form, a new workflow is started (which has the state NEW). This instance of the workflow has the same ID as the corresponding data record. So there is a connection between the record and the workflow. Then workflowExecuteCommand is run and the workflow enters the requested state.
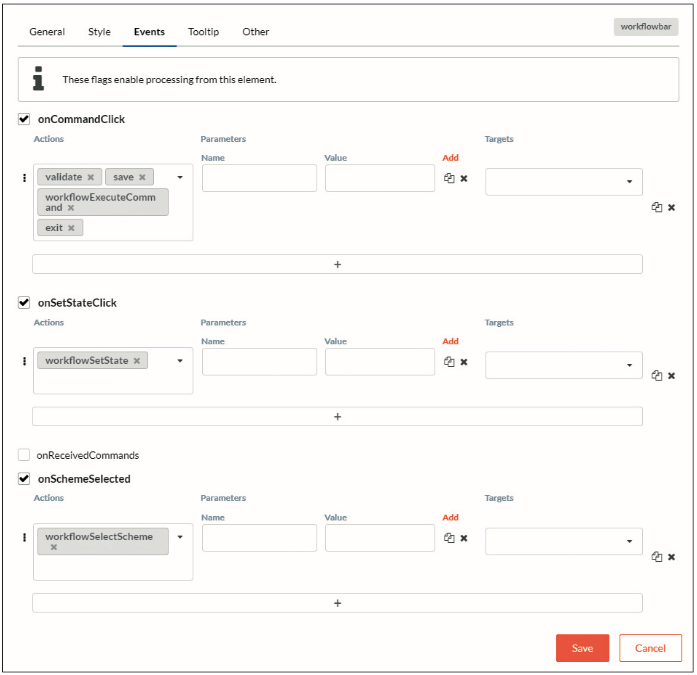
Fig. 8: Event handling for the control, here the WorkflowBarServer-side, one could react to the WorkflowStatusChanged event and save a previous record, for example. Now the actions that are stored for the status Requested are performed. More about this later.
Next, the workflow is automatically transitioned to the second state rejected. Once again, WorkflowStatusChange is called on the server and it is checked which implementations this status has (for example, notify the requester). For each status, it can be defined in the workflow which method (SendEmail, CreateInvoice, etc.) is called. If workflowExecuteCommand is completed and there was no error, the next action is executed: Exit. The form is closed. Parameters can also be passed generically for each action.
Conclusion and outlook
In this second part of the series, you have learned how to manage data and design forms. In the next part of the Low-Code series, you will learn what possibilities there are to execute code on the server-side, how to write your own actions and how to design the workflow so that it does justice to the task set at the beginning.
Author: Bernhard Pichler (LinkedIn)
Graduate theologian Bernhard Pichler was the CEO of the software company Informare for 20 years , before he got named Head of development and product management of DPS BS. DPS BS is Germany’s largest software partner for business management software for small and medium-sized businesses.