Workflow features overview
You will find all information you need on workflow in DWKit in this section. Start by watching our video tutorial!
Video tutorial
Workflow features in the admin panel
Manage schemes
Process schemes are created in the admin panel interface located in Workflow/Manage schemes. When we create a new scheme, DWKit requires to name it. This name is actually scheme code, and it's a very important aspect. It is used to create a process according to scheme. I.e. DWKit tells Workflow Engine.NET to create a process for a certain document with a certain scheme code (name). Knowing this name helps you search for process in the system, when you need to perform a non-standard operation with it. Creating / editing interface of the process scheme looks as shown below.
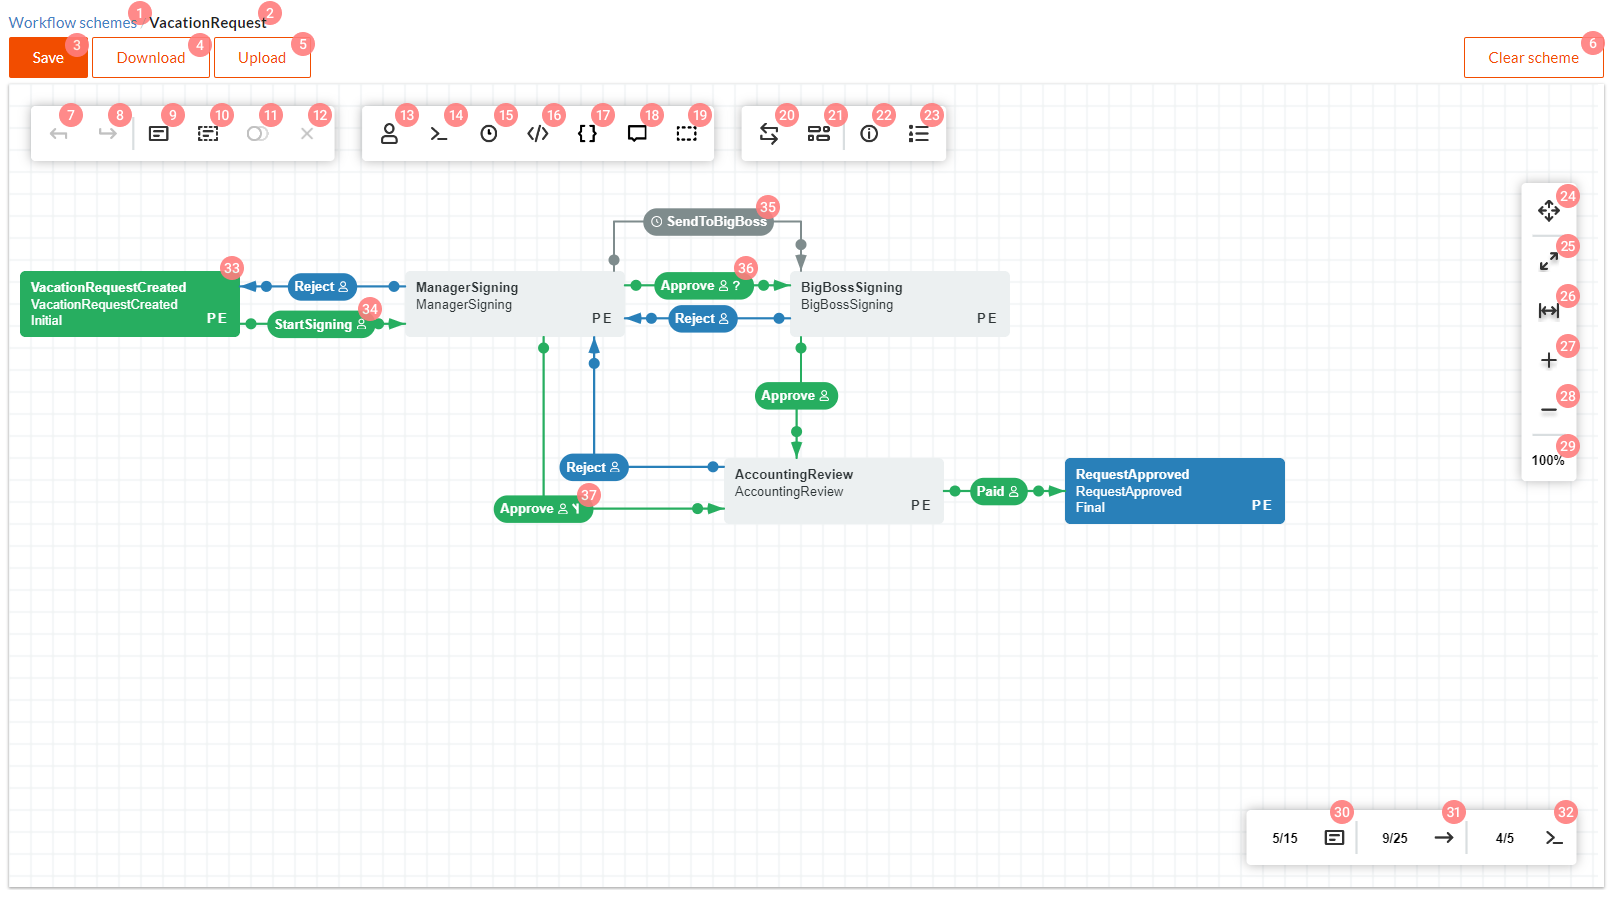
Control elements in this interface have the following functions:
- Transition to interface with all available workflow schemes.
- Opened scheme code (name).
- Save - saves scheme. Read more about updating old process to the new scheme (i.e. about scheme versioning) in the Scheme Update section.
- Download - downloads scheme XML file.
- Upload - allows to upload scheme XML file.
- Clear Scheme - deletes all scheme elements.
Below you'll find Workflow Engine.NET Designer control elements with links to relevant documentation sections.
- Undo button - cancel previous action in the designer.
- Redo button - redoes previous action in the designer.
- Creates new Activity.
- Creates new Inline Activity.
- Copies selected scheme elements.
- Deletes selected scheme elements.
- Access to the interface of editing, adding and deleting Actors. This is related to creating rules of user access to scheme commands.
- Access to the interface of editing, adding and deleting Commands. I.e. commands which are displayed to user and which he can execute.
- Access to the interface of editing, adding and deleting Timers.
- Access to the interface of editing, adding and deleting Code actions. Code actions is the code inside the scheme which can be executed as Action or Rule (also known as Authorization Rule).
- Access to the interface of editing, adding and deleting Process parameters.
- Access to process scheme localization interface.
- Marks this scheme as available for inlining.
- Updates opened scheme with a scheme saved in the database. Attention! This button resets all unsaved changes!
- Automatic alignment of scheme elements on the canvas.
- Turns on display mode of extended info on scheme elements.
- Opens legend in which all scheme conventional signs are described.
- In this mode you can move canvas by clicking and holding the left mouse button. If this mode is off, holding the left mouse button leads to elements selection frame popping up.
- Turns on designer display in full view mode.
- Sets scheme default position and 100% zoom.
- Zoom In.
- Zoom Out.
- Current zoom value.
- Displays current / maximum possible number of Activities in the scheme. Maximum possible number is defined by the license key.
- Displays current / maximum possible number of Transitions in the scheme. Maximum possible number is defined by the license key.
- Displays current / maximum possible number of Commands in the scheme. Maximum possible number is defined by the license key.
- This is Activity. It can represent both intermediate and stationary state of process. It also can define process business state, or State. Read more about differences between Activity and State here. Actions which are to be executed are set with the using of Actions.
- This is Transition. In the center the name of the Command is displayed, which launches this transition. Small man icon on the left of the command name means that this transition is available only to specific users.
- This is Transition. To the left you can see the timer icon, and the name of this timer is in the center. Thus transition will be automatically launched according to timer settings.
- This is conditional Transition. You can set the condition which must
return
truefor this transition to be executed, using Condition (Action). - This is another conditional Transition. However, it is executed if all
other conditional transitions cannot be executed, because their conditions returned
false. In other words, this is the lastelsein theif..then..elseoperator.
Managing instances
All processes created in the system are displayed in the Workflow/Manage instances interface in the admin panel. Apply filter to search for instances.

The following filtration is possible. If several conditions are set, they are concatenated with each other by AND.
- Process Id - process guid ID. If your workflow entity (form) has guid primary key, process ID will coincide with it.
- Scheme - scheme code (name).
- Status - process execution status. Read more about statuses and their meanings in the Lifecycle of a regular process section.
- Current process activity name.
- Current process business state. Read more about differences between Activity and State here.
Double click process entity to open scheme designer in the readonly mode. Here you can change process State and Status.
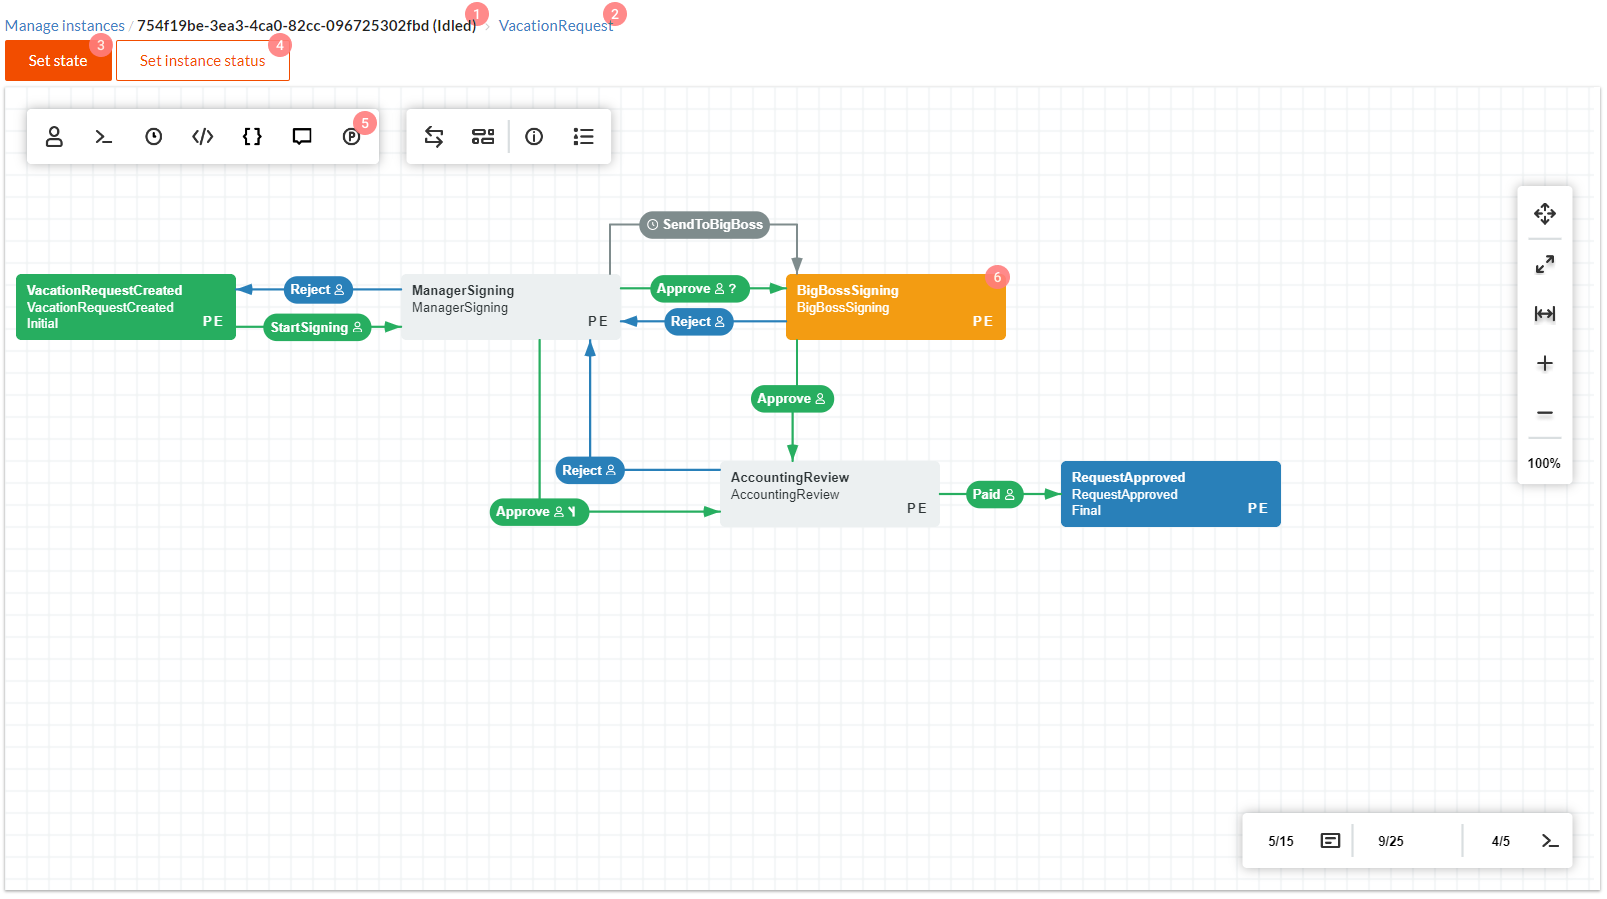
This interface is a little bit different from the process scheme editing interface. Let's look at the differences.
- Process guid ID.
- Transition to scheme editing. Please, note that it is transition to scheme of all processes created by this scheme, and not to a certain process scheme. Read more about updating old processes to a new scheme (i.e. about scheme versioning) in the Scheme Update section.
- Setting new business state to a process.
- Setting new process status.
- Button, displaying all parameters for a certain process.
- Current activity.
Other features
You can read about other features in separate documentation sections:
Workflow features on server
Pay attention to these objects on server-side.
- Workflow runtime is the main object which manages process execution on
server. It is configured in
the OptimaJet.DWKit.Application/WorkflowInit.cs
class. Workflow runtime is fully configured in DWKit. However, pay attention to the following code and methods in this class:
runtime.OnWorkflowError += (sender, args) => {...}- this is error handler. You might want to change it.ActivityChanged (...)- this method is called when process is transitioned from one activity to another..WithActionProvider(ActionProvider ?? new ActionProvider())- here Action provider is set. It is already included into the project, but you might want to change it..WithRuleProvider(RuleProvider ?? new RuleProvider())- here Rule provider is set. It is already included into the project, but you might want to change it..WithTimerManager(TimerManager ?? new TimerManager())- here Timer manager is set. Timers in Workflow Engine.NET will not work without it.
- OptimaJet.DWKit.Application/WorkflowActions.cs - Action provider included into DWKit project.
- OptimaJet.DWKit.Application/RuleProvider.cs - Rule provider included into DWKit project.
WorkflowController- client interacts with server via this controller. It is fully described here.