How to build the Vacation Request like app with DWKit
In this section, we are going to demonstrate how to create a system of the Vacation Request level (this is our demo) without resorting to code.
The system to be created has one data model - Document, with the following attributes:
- Name
- Number (an incremental field with the values of 1,2,3, etc.)
- Date
- Author
- Manager
- Amount
- Comment
The document should be sent from one user to another according to the path specified. The document should contain the history of transitions, as well as the list of future approval stages so that the user understands what stages the document will go through and who will consider the document at these stages. The 'Approve' and 'Reject' commands should be provided in the system. In case of rejection, a comment is required. The user interface should be responsive and correctly displayed on desktop, tablet, and mobile.
Step 1. Deploy DWKit
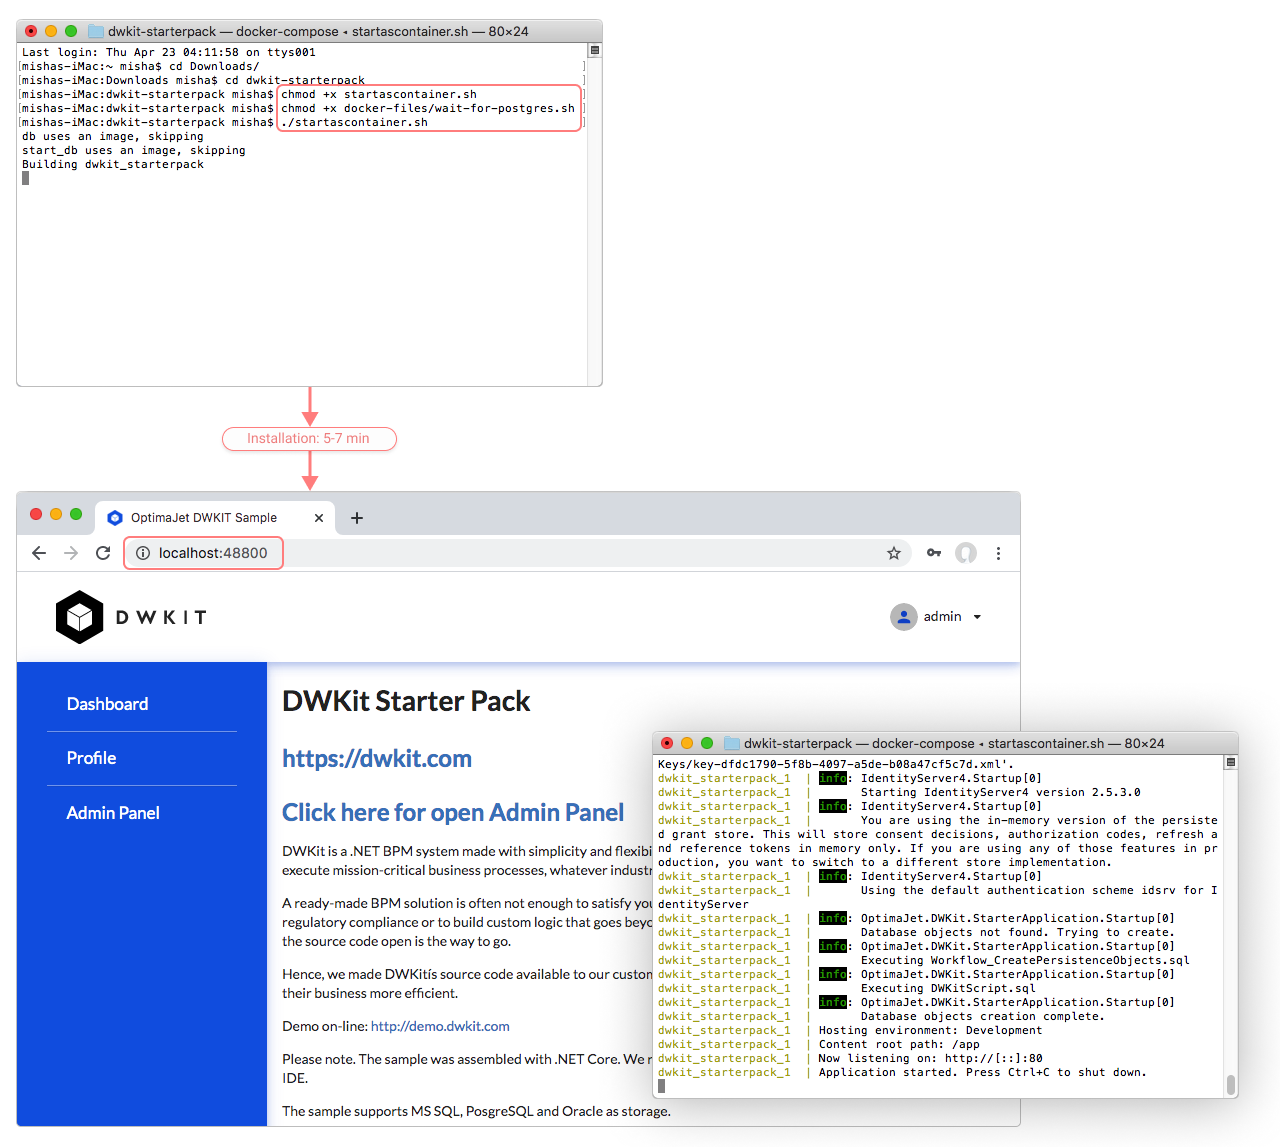
Run DWKit according to the instructions. In this guide, we run DWKit using Docker. Download StarterPack from the site. Unzip, open the folder in the terminal, and execute the following three commands:
chmod +x startascontainer.sh
chmod +x docker-files/wait-for-postgres.sh
./startascontainer.sh
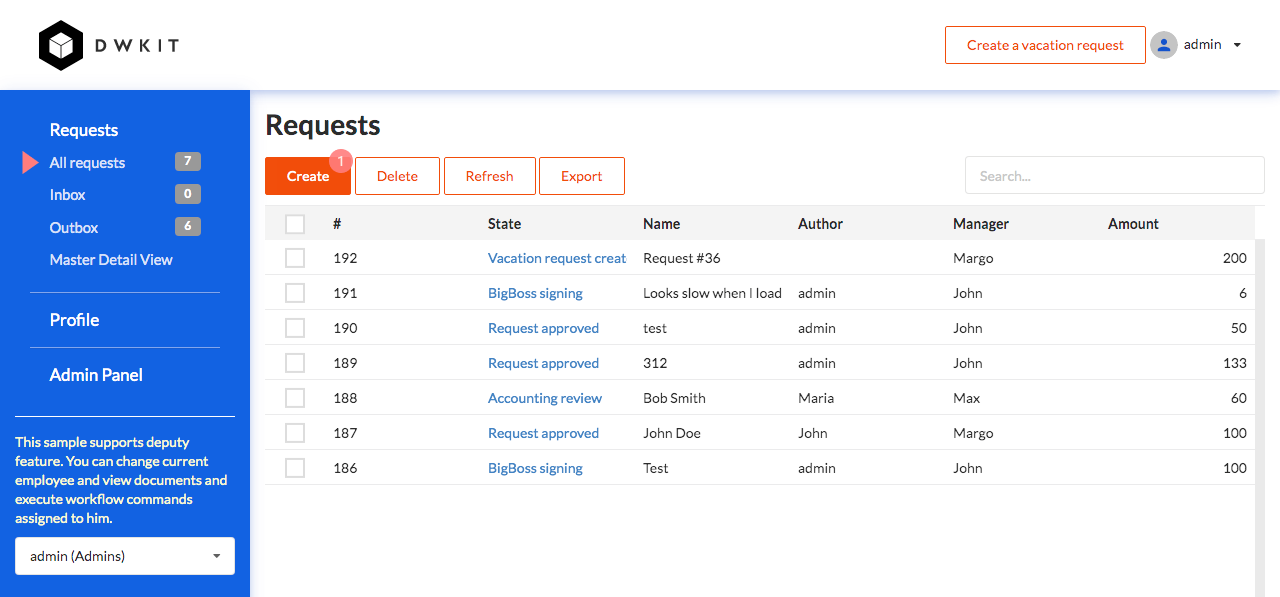
After DWKit starts, open the URL http://localhost:48800/ in the browser. Enter login "admin", password - "1", click Login. The following page opens:
To get to the admin panel, click on the Admin Panel option in the left menu or open the following url: http://localhost:48800/admin. Hereinafter, we use:
- http://localhost:48800/ - for the end user interface.
- http://localhost:48800/admin - for the admin panel.
You may change Port 48800 by yourself in start.bat/start.sh or docker-compose.yml, depending on the startup method.
Thus, DWKit is deployed and ready to build an application.
Step 2. Create Users and Roles
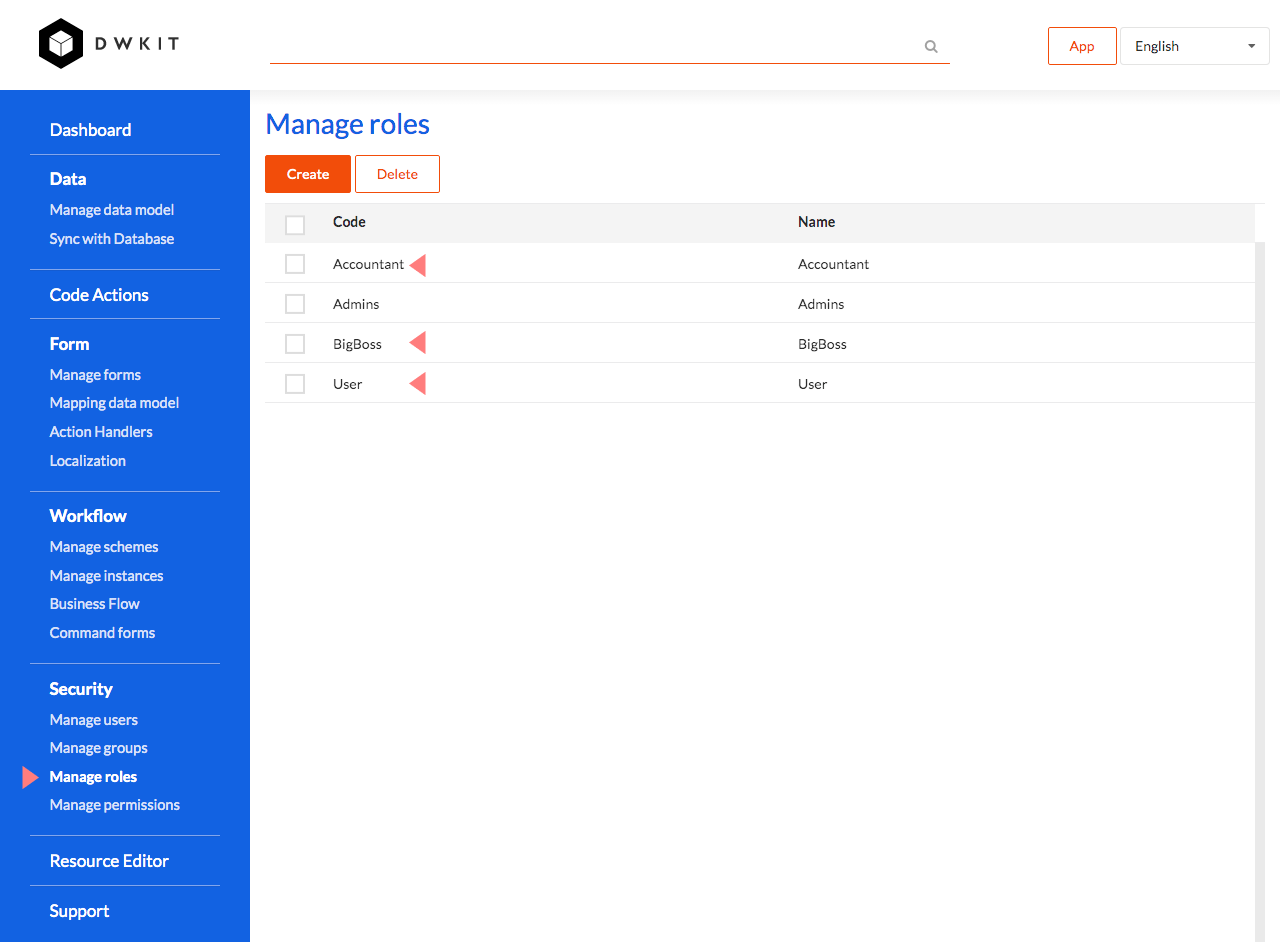
First, you should add a few roles to the system, using the page http://localhost:48800/admin?apanel=roles. Add the following roles:
- Accountant
- BigBoss
- User
For a more detailed description of the interface to create and edit the roles, see the documentation.
Now, you should make users. DWKit supports user import via LDAP, but here we are going to create users manually, using the page http://localhost:48800/admin?apanel=users. Add the following users to the system and associate them with the roles specified above:
- John, Margo, Mark etc. - User;
- Maria - Accountant;
- Silviya - BigBoss;
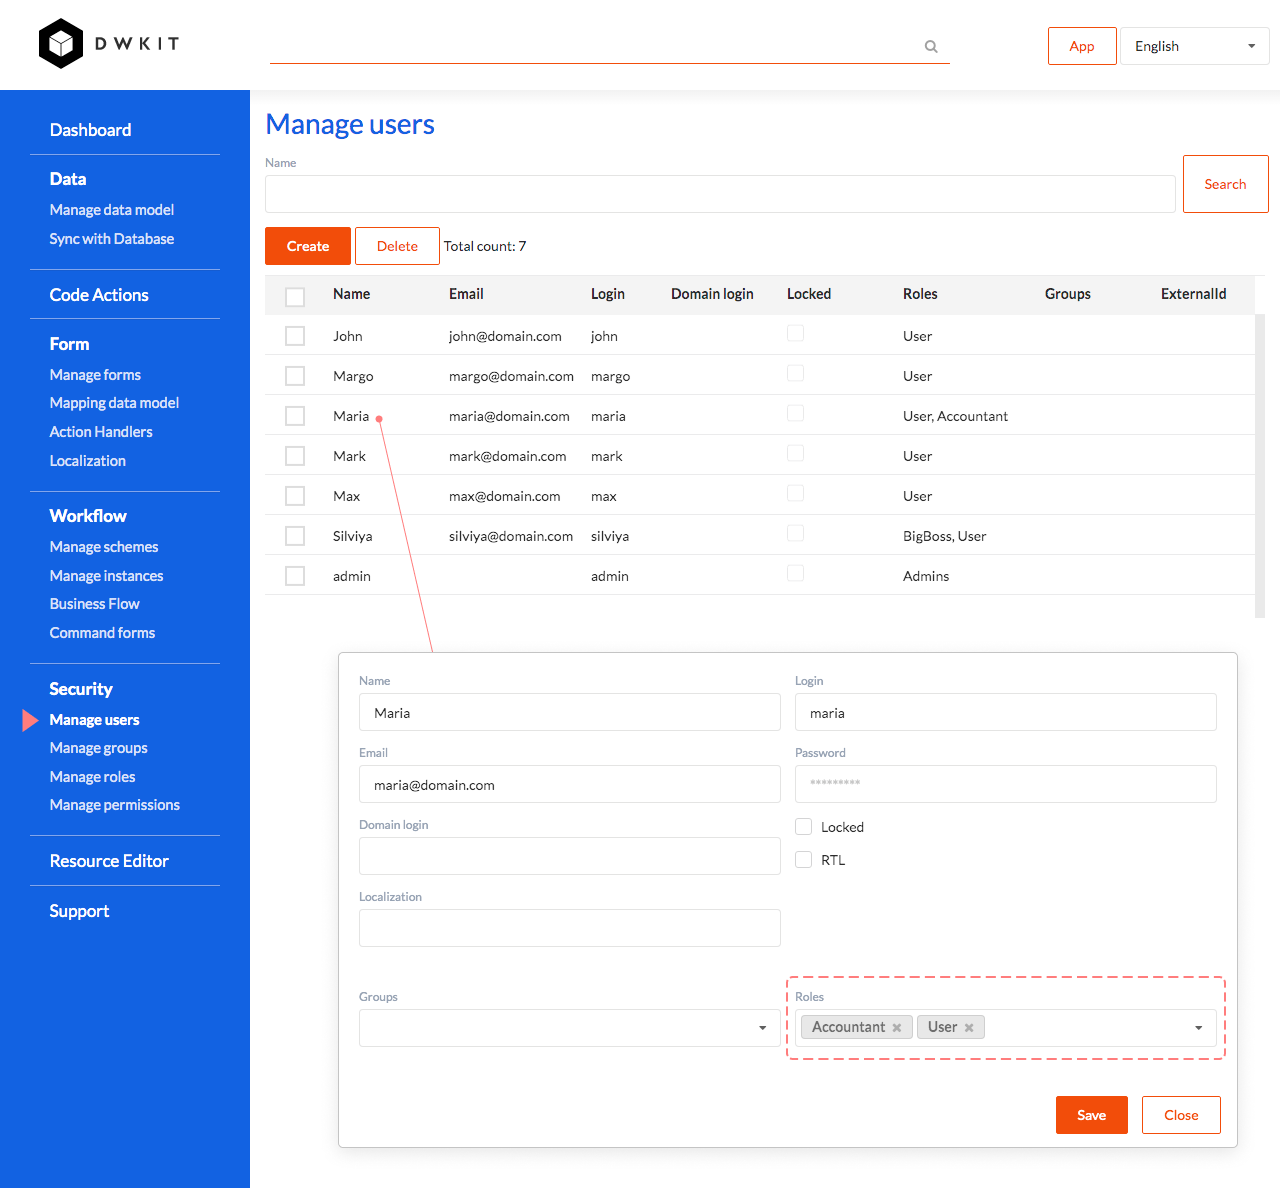
For a more detailed description of the interface to create and edit the users, see the documentation.
Step 3. Create Data Model
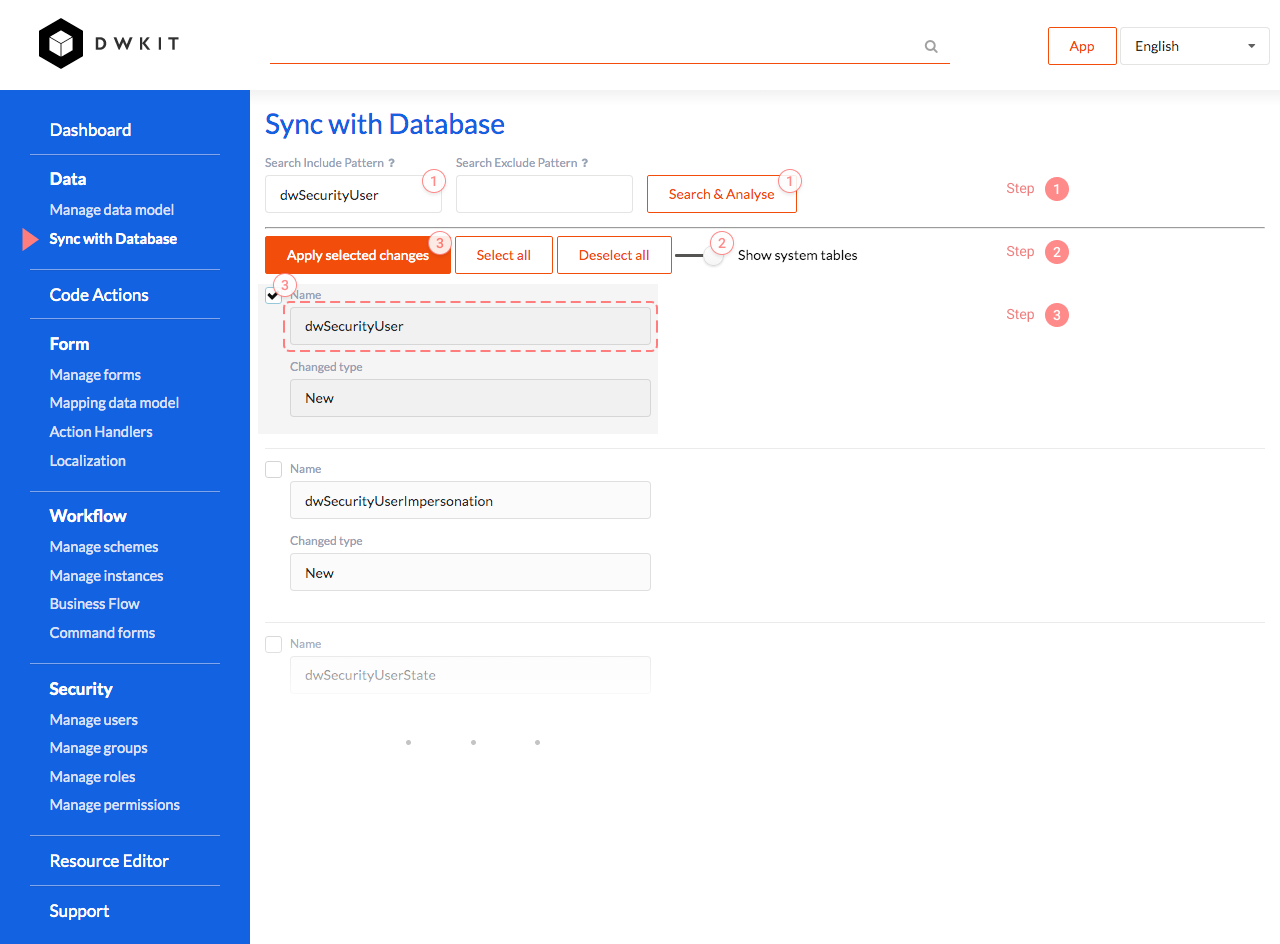
Since a table of users should be created to work with, add dwSecurityUser table to the data model. This table is already in the database, hence, use synchronization with the database as described here. You should analyze the database and add the dwSecurityUser table to the model.
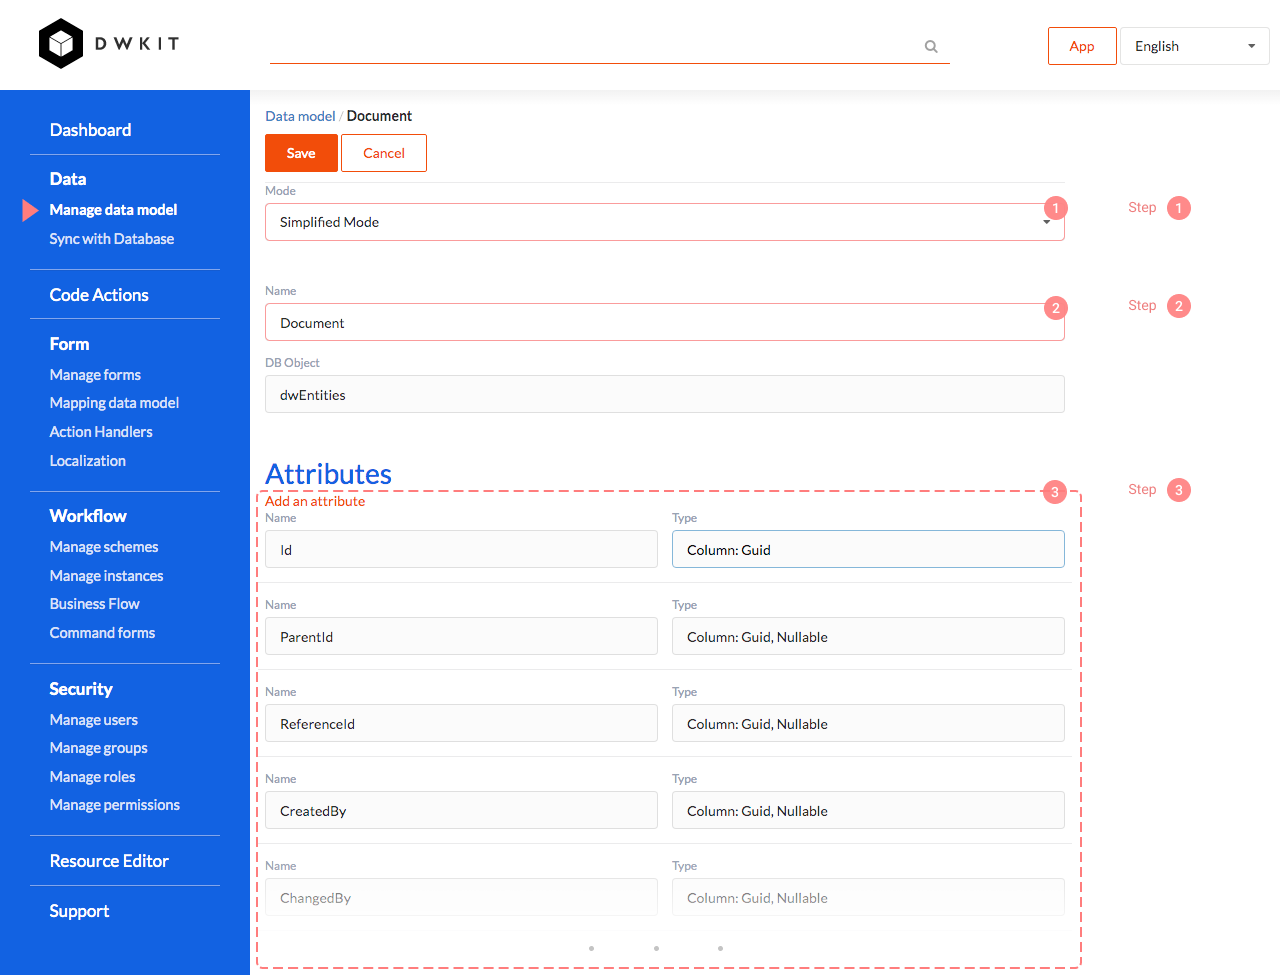
Then, create the Document model with the following attributes:
- Id – GUID (already available in the Simplified mode).
- Name – String (already available in the Simplified mode).
- Number – Int64.
- Date – DateTime.
- AuthorId – link on dwSecurityUser data model.
- ManagerId – link on dwSecurityUser data model.
- Amount - Decimal.
- Comment - String.
Here, we use the Simplified mode. In this mode, you do not need to create tables in the database, DWKit saves the data in the dwEntities table. In this mode, the Id and Name fields are automatically set in the table. The remaining fields are stored as extension attributes. Then, add the missing columns to the model and indicate their data type or the data model referenced by the attribute added.
Thus, we have created each of the data models for our example to work with, without resorting to code or SQL scripts.
Step 4. Set up Plugins
The DWKit plugins is a predefined common functionality to be used in your system. You may also write plugins of your own. But for now, we are going to use those provided by the DWKit package only.
To get started, set the name of the system to be created in the Settings tab on the Dashboard page.
Then, set up the plugins. All of the plugins are enabled and configured in the Plugins tab on the Dashboard page. For our example, we will use the Basic Plugin, Workflow Plugin and Notification Plugin.
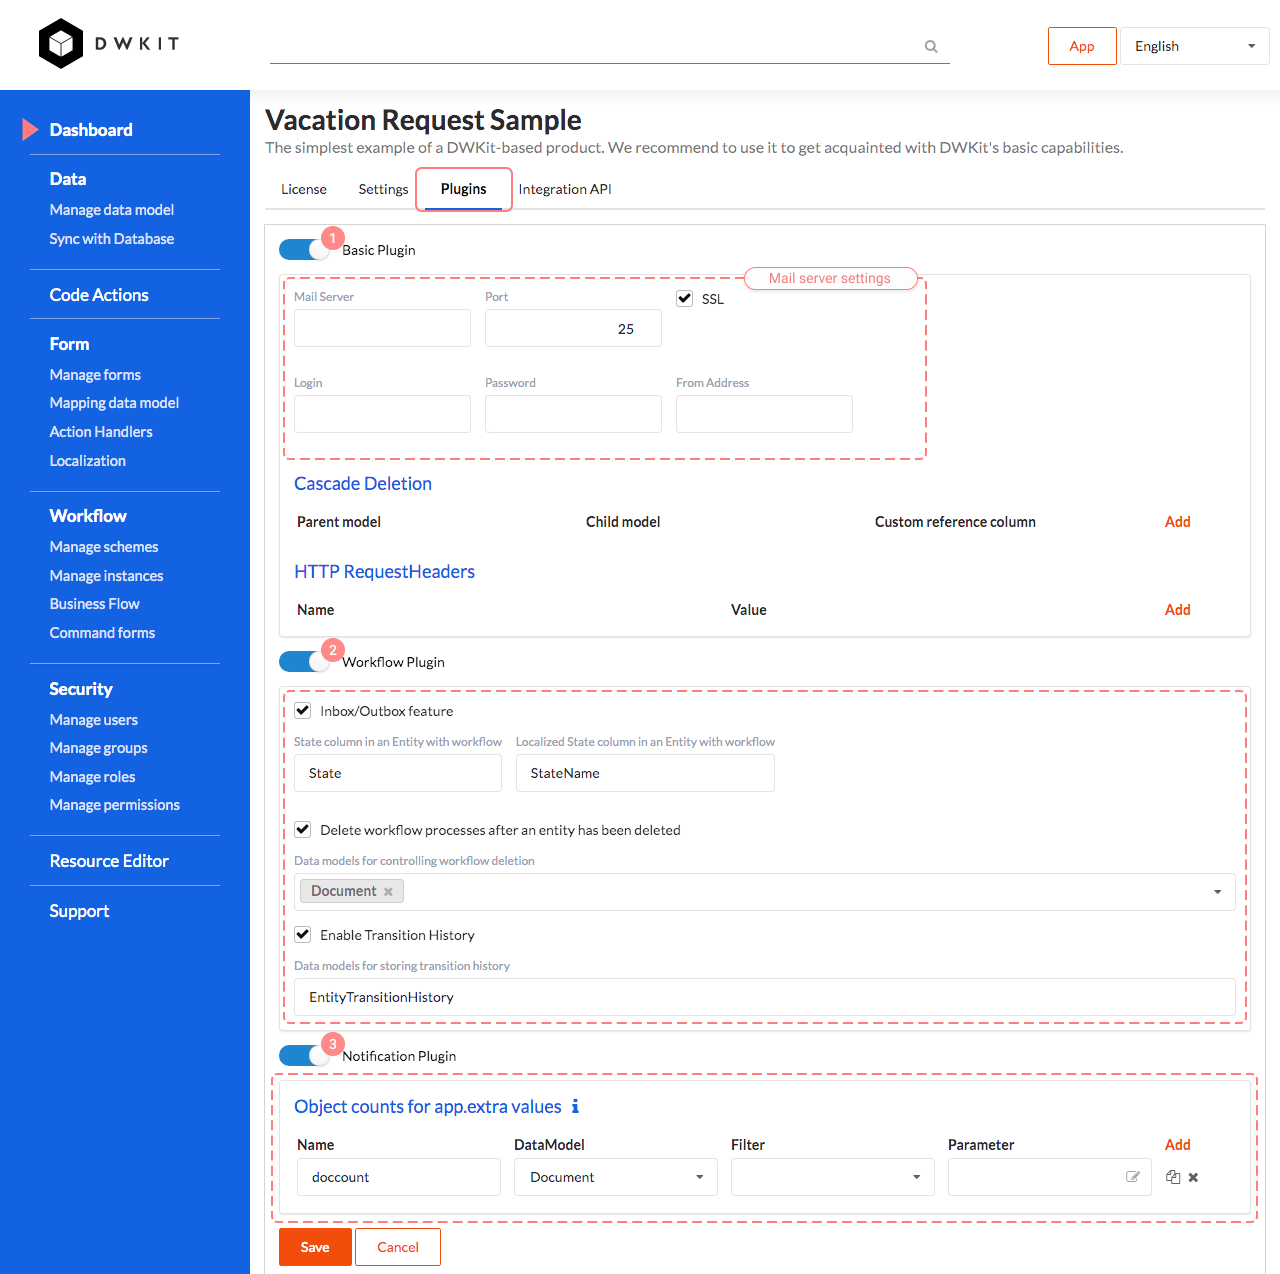
Basic Plugin adds the basic operations as SendEmail, SetFields, SetParameter and user role checking (the CheckUser and CheckRole rules are used when creating the workflow scheme). If you plan to use Email sending, fill in the details of your mail server.
Workflow Plugin adds inbox and outbox functionality, deletion of the workflow process when deleting a document, and a table with the document approval history. For our example, enable the Inbox/Outbox feature. The workflow state name is stored in the State and StateName attributes of the Document data model. As you remember, we have created the Document data model in the Simplified Mode, hence, these fields are added automatically. In order to delete the workflow process when deleting your document, add the model name in the Data models for controlling workflow deletion field. The approval history is stored in the EntityTransitionHistory model; the plugin creates it automatically after saving the changes.
Notification Plugin is used to send notifications to the client; for example, if a new document has been created. Add the doccount
entry (this variable is passed to the browser from the server) and specify the Document in the DataModel. Now, the total number of the
documents available in the system is stored in the app.extra.doccount variable in the client. This plugin works through SignalR; more
about the operational mechanisms can be found here.
That is the whole setup procedure of the plugins you require.
Step 5. Create Forms
In our system, we are going to use four standard forms. These four types cover approximately 90% of the whole variety of forms used in real systems.
- Grid - a grid with a list of documents, search and filter operations.
- Edit form - a form for document editing with buttons for workflow commands.
- Master-detail - a grid + an editing form, convenient for editing small dictionaries.
- Side bar (left menu) - a menu with counters for the documents available in the system.
Step 5.1. Grid Page
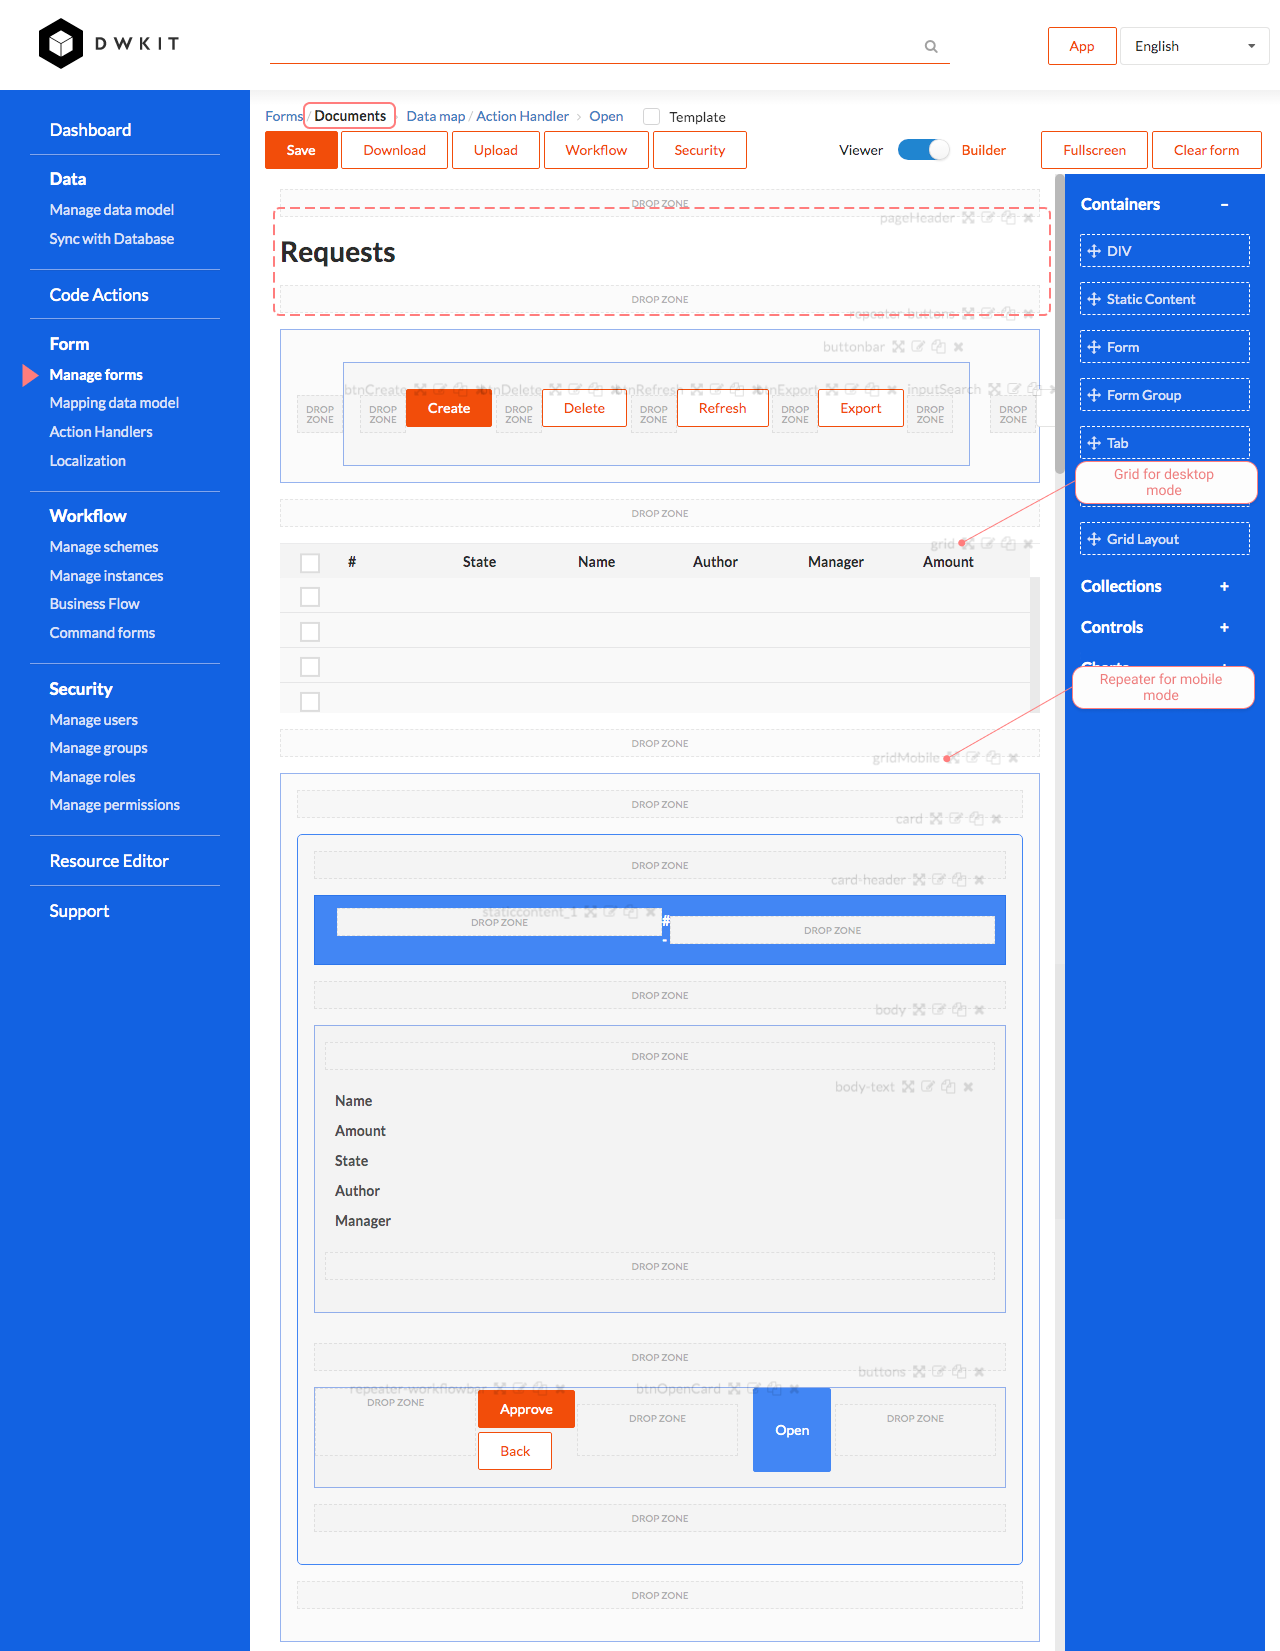
This form displays the whole list of the documents available in the system, as well as the contents of the inbox and outbox folders for the user logged in. The form looks different on a large and small screen. The form contains a toolbar with buttons to manage the documents, and two grids: one grid to be displayed on a large screen, for example, on desktop, and the second grid - on a small screen, that is on a tablet or mobile phone. The form is rather big, its markup and client code can be downloaded from here. Below, we denote the points you should pay attention to.
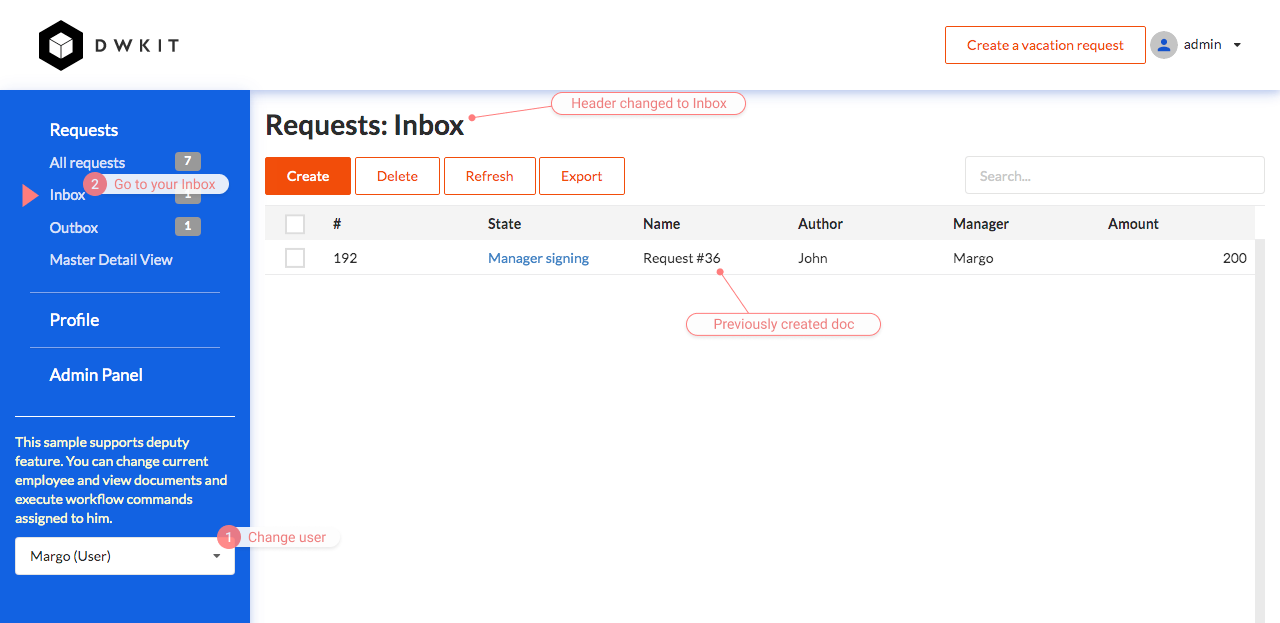
The title - pageHeader - is changed depending on whether the form displays the whole list, inbox, or outbox. We change it with the client code, called Client application actions in DWKit.
For large screens, the table is a grid made through the GridView control. To check it, turn on the adaptive mode and display on Desktop. For mobiles, the table is a gridMobile made through the Repeater control. This control has display mode enabled for Mobile. In DWKit, this approach is called Adaptive layout.
Additionally, the form contains a toolbar of buttons to create, delete, and export the grid to Excel. The corresponding predefined Client application actions are specified for each button. That is, no code required to make these buttons to work.
For the detailed documentation on working with forms, see here.
Next, we establish a relationship between the form and the data in the Mapping data model section. For the detailed description of mapping models and shapes, see here. In the Data map, we create a Document collection and perform control mapping. The AuthorId and ManagerId attributes are reference attribute, hence, on loading them, we enable the user names - AuthorId_Name and ManagerId_Name.

Then, we move on to writing the client code for this form. In principle, the code is not necessary, but we want to make two improvements:
- add a link to the record editing page in one of the grid columns.
- change the pageHeader value in the form, depending on the list of documents opened (the whole list of documents, inbox, or outbox).
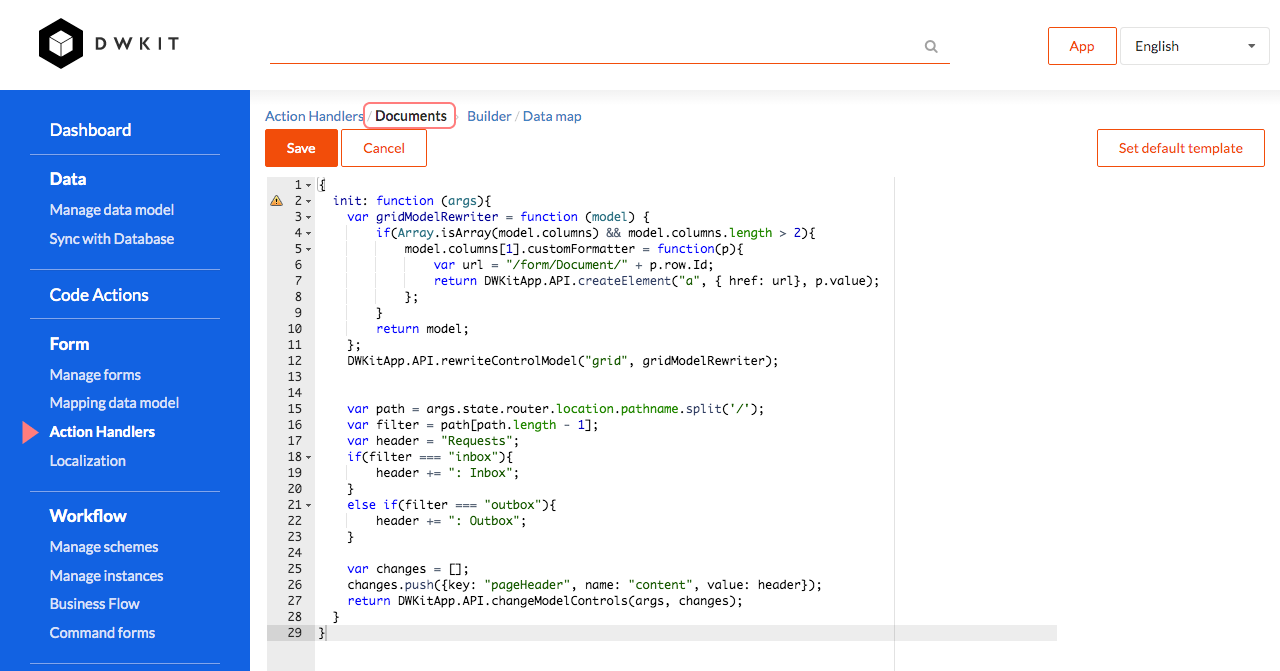
Let us move on to Action Handlers and add the following code. The init function is always called when the page is initialized. Here is the init function code:
init: function (args) {
    var gridModelRewriter = function (model) {
        if (Array.isArray(model.columns) && model.columns.length > 2) {
            model.columns[1].customFormatter = function (p) {
                var url = "/form/Document/" + p.row.Id;
                if (args.state.app.impersonatedUserId) {
                    url += "/?impersonatedUserId=" + args.state.app.impersonatedUserId;
                }
                return DWKitApp.API.createElement("a", {href: url}, p.value);
            };
        }
        return model;
    };
    DWKitApp.API.rewriteControlModel("grid", gridModelRewriter);

    var path = args.state.router.location.pathname.split('/');
    var filter = path[path.length - 1];
    var header = "Requests";
    if (filter === "inbox") {
        header += ": Inbox";
    } else if (filter === "outbox") {
        header += ": Outbox";
    }

    var changes = [];
    changes.push({key: "pageHeader", name: "content", value: header});
    return DWKitApp.API.changeModelControls(args, changes);
}
The first part of the code installs a custom formatter for the second column that displays a link to the editing form. The second part of the code adds the 'Inbox' or 'Outbox' value to the pageHeader.
Go to the FormBuilder page and click the Open button. The form, which we have just created, opens in a new window. The address is http://localhost:48800/form/documents. 'documents' – is the form name. The form is adaptive and fits a window on resize. Just change the width of the browser window to see how it works.
So far, the table has no records. The next step is to create an editing form for the Document object.
Step 5.2. Editing Form
Now, we are going to create a document editing form that contains
- brief information about the document.
- document fields that are editable.
- workflow command buttons.
- approval history of the document (i.e. the document path through the workflow stages).
- save, copy buttons, etc.
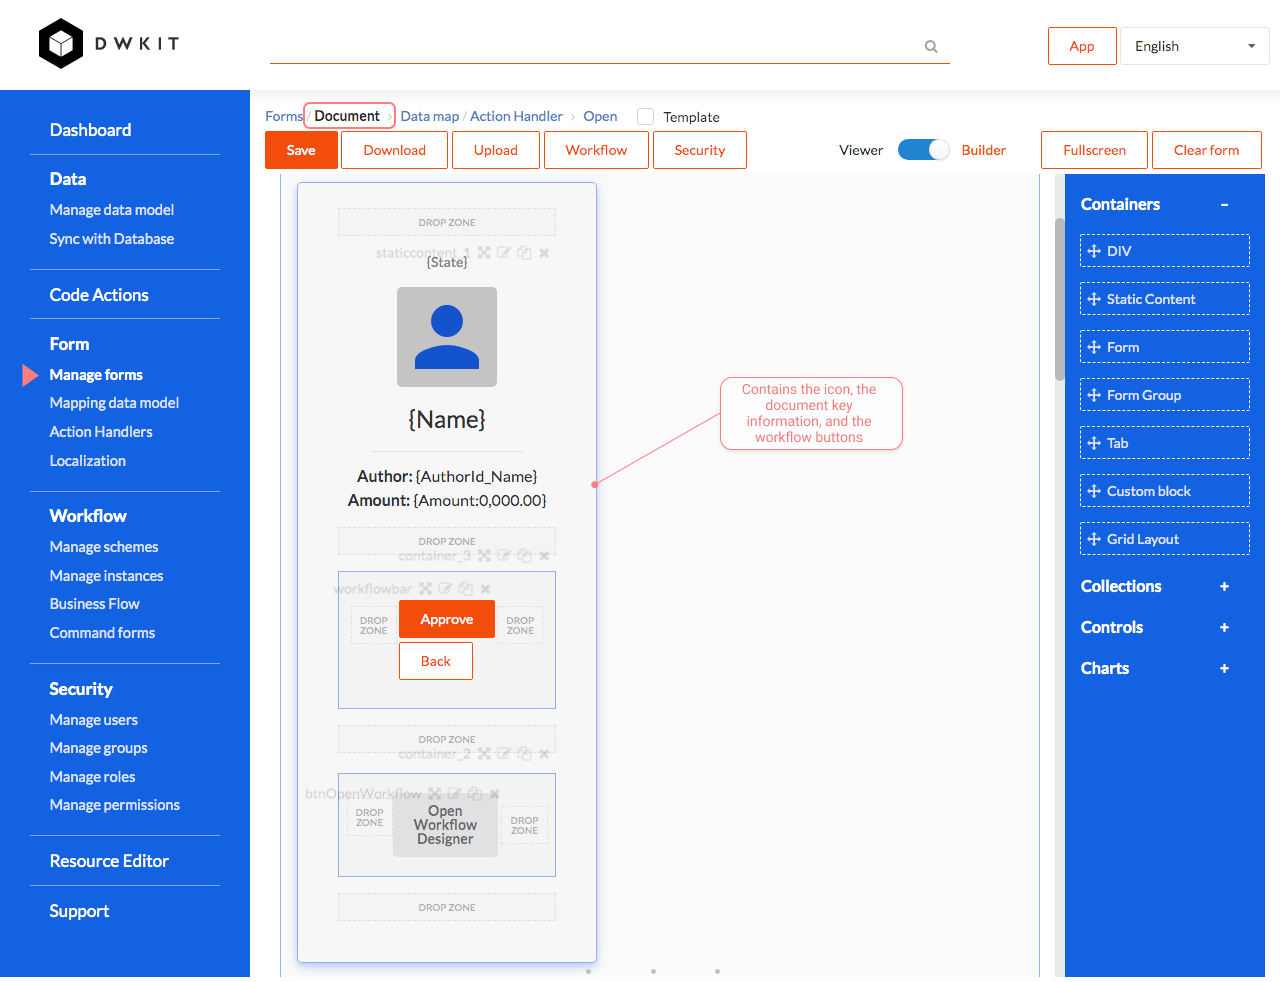
Let the form name be Document. The form has an adaptive layout. The form is rather large, its markup and client code can be downloaded. Now, we denote what points you should pay attention to.
-
infoblock container - contains the icon, the document key information, and the workflow buttons.
-
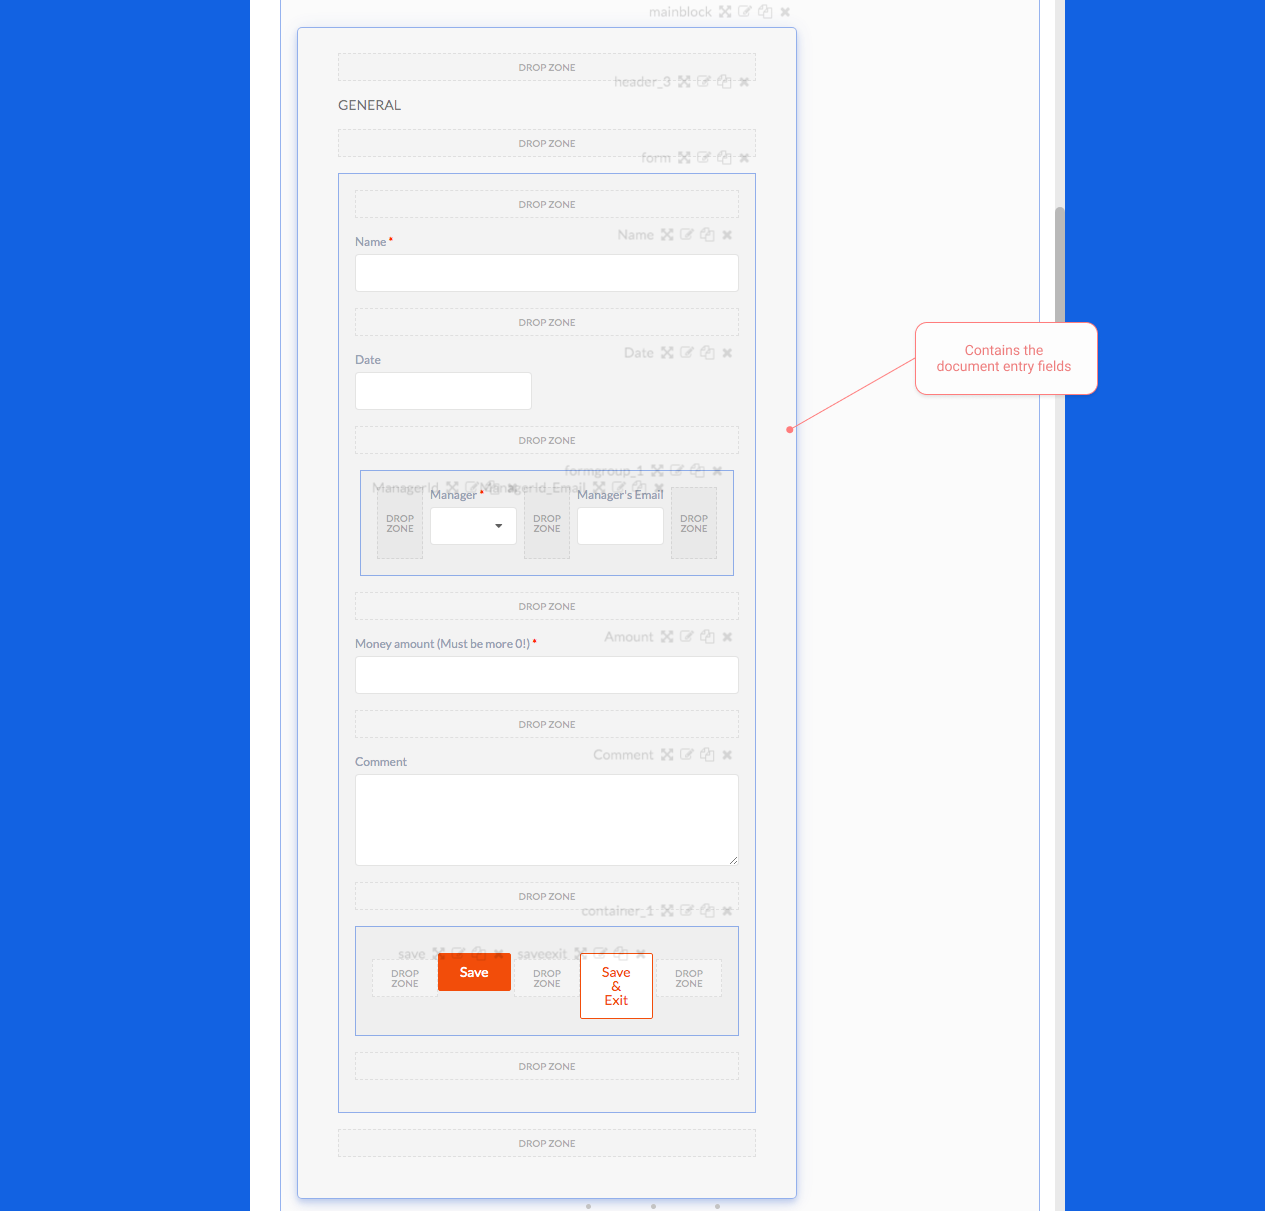
mainblock container - contains the data entry fields.
-
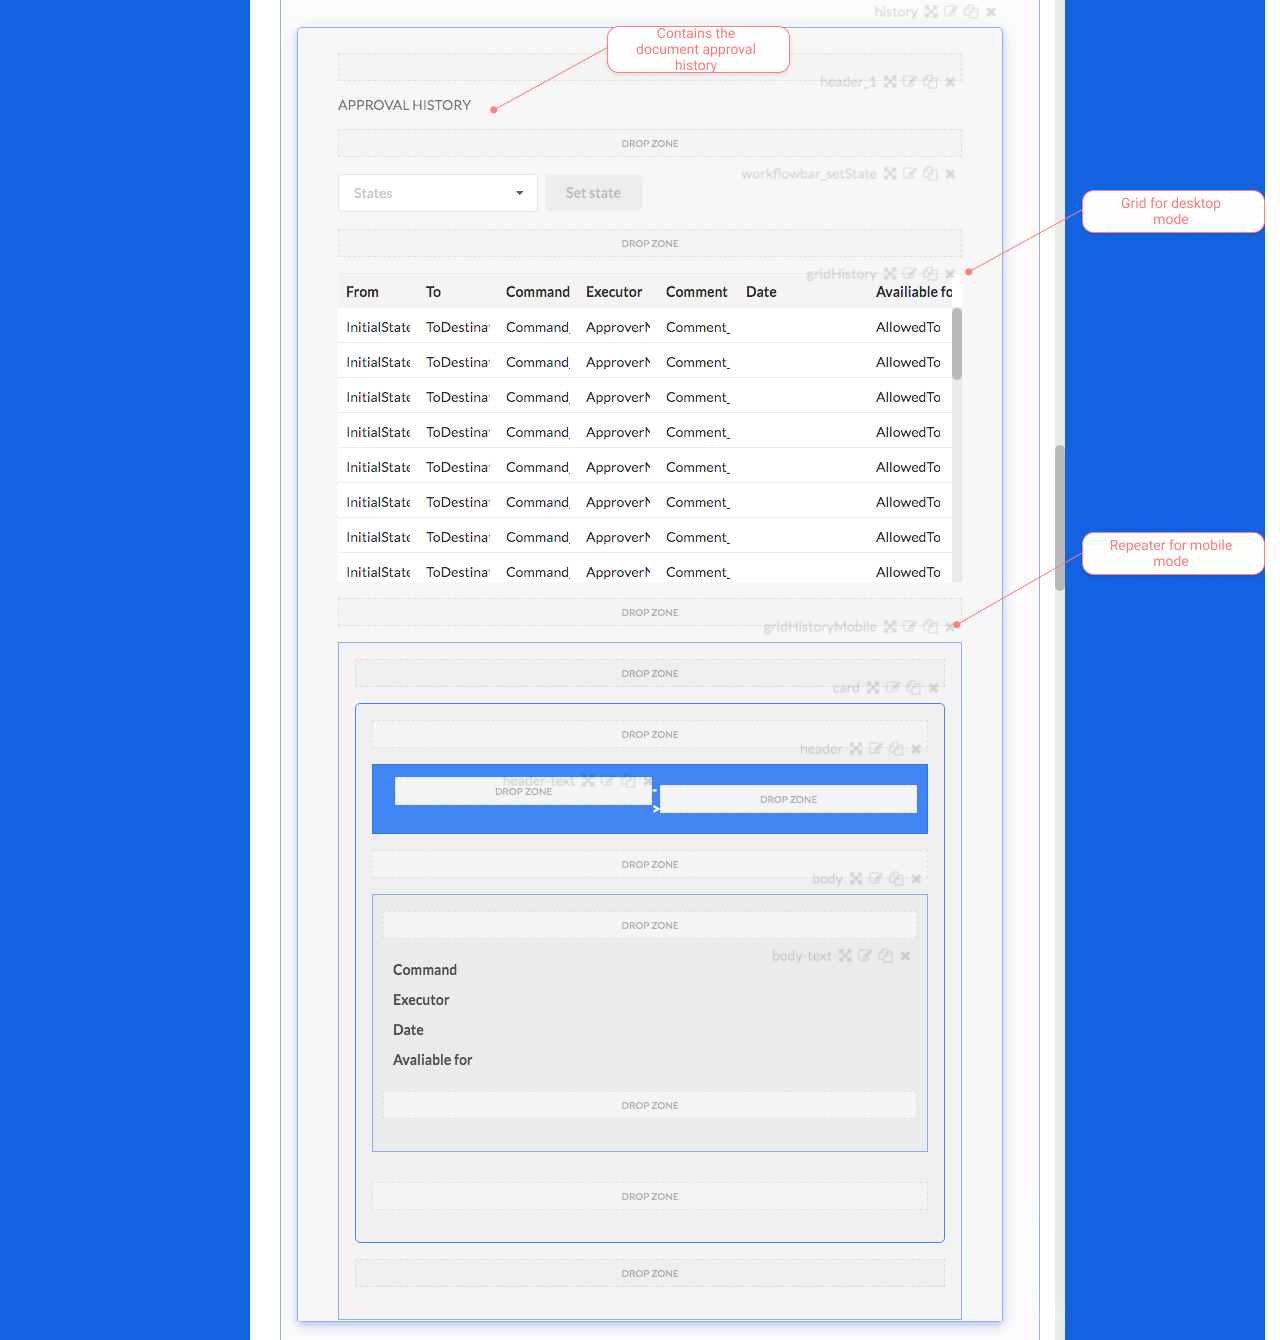
history container - contains the document approval history. It also contains two controls, gridHistory and gridHistoryMobile. The first is displayed in desktop mode, the second - in mobile mode. They both have the Property Name specified, so that to be bound to the same data collection.
Next, we bind the form and the data. In the Main entity field, select the Document model. We should perform mapping of the form controls and the data model attributes. On clicking the Auto mapping button, DWKit tries to match the form controls and the data model attributes automatically. We should also include the field AuthorId_Name, and match the ManagerId_Email value with the ManagerId_Email field.
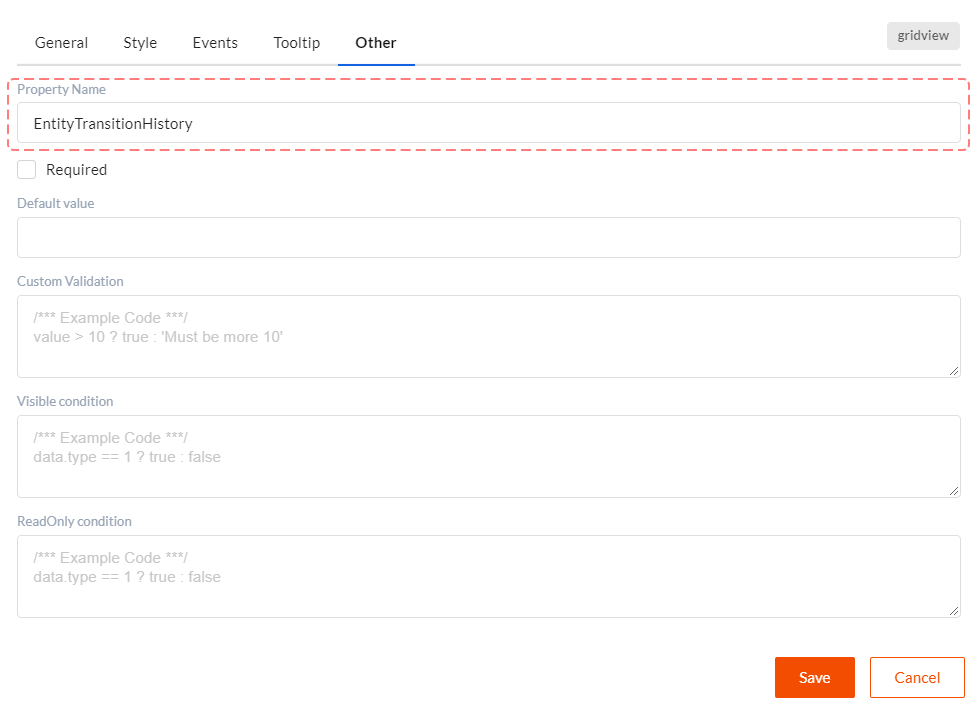
For the history block, we should connect the collection with the approval history controls. Add the EntityTransitionHistory collection, set the ReadOnly flag. This flag means that this form will not save data in the collection when saving the form or executing commands. The values in this collection are automatically populated by the workflow engine. In this case, we do not map the control to the collection, because, in the gridHistory and gridHistoryMobile in the Other tab, the Property Name value is set to EntityTransitionHistory. The description of the mapping procedure can be found here.
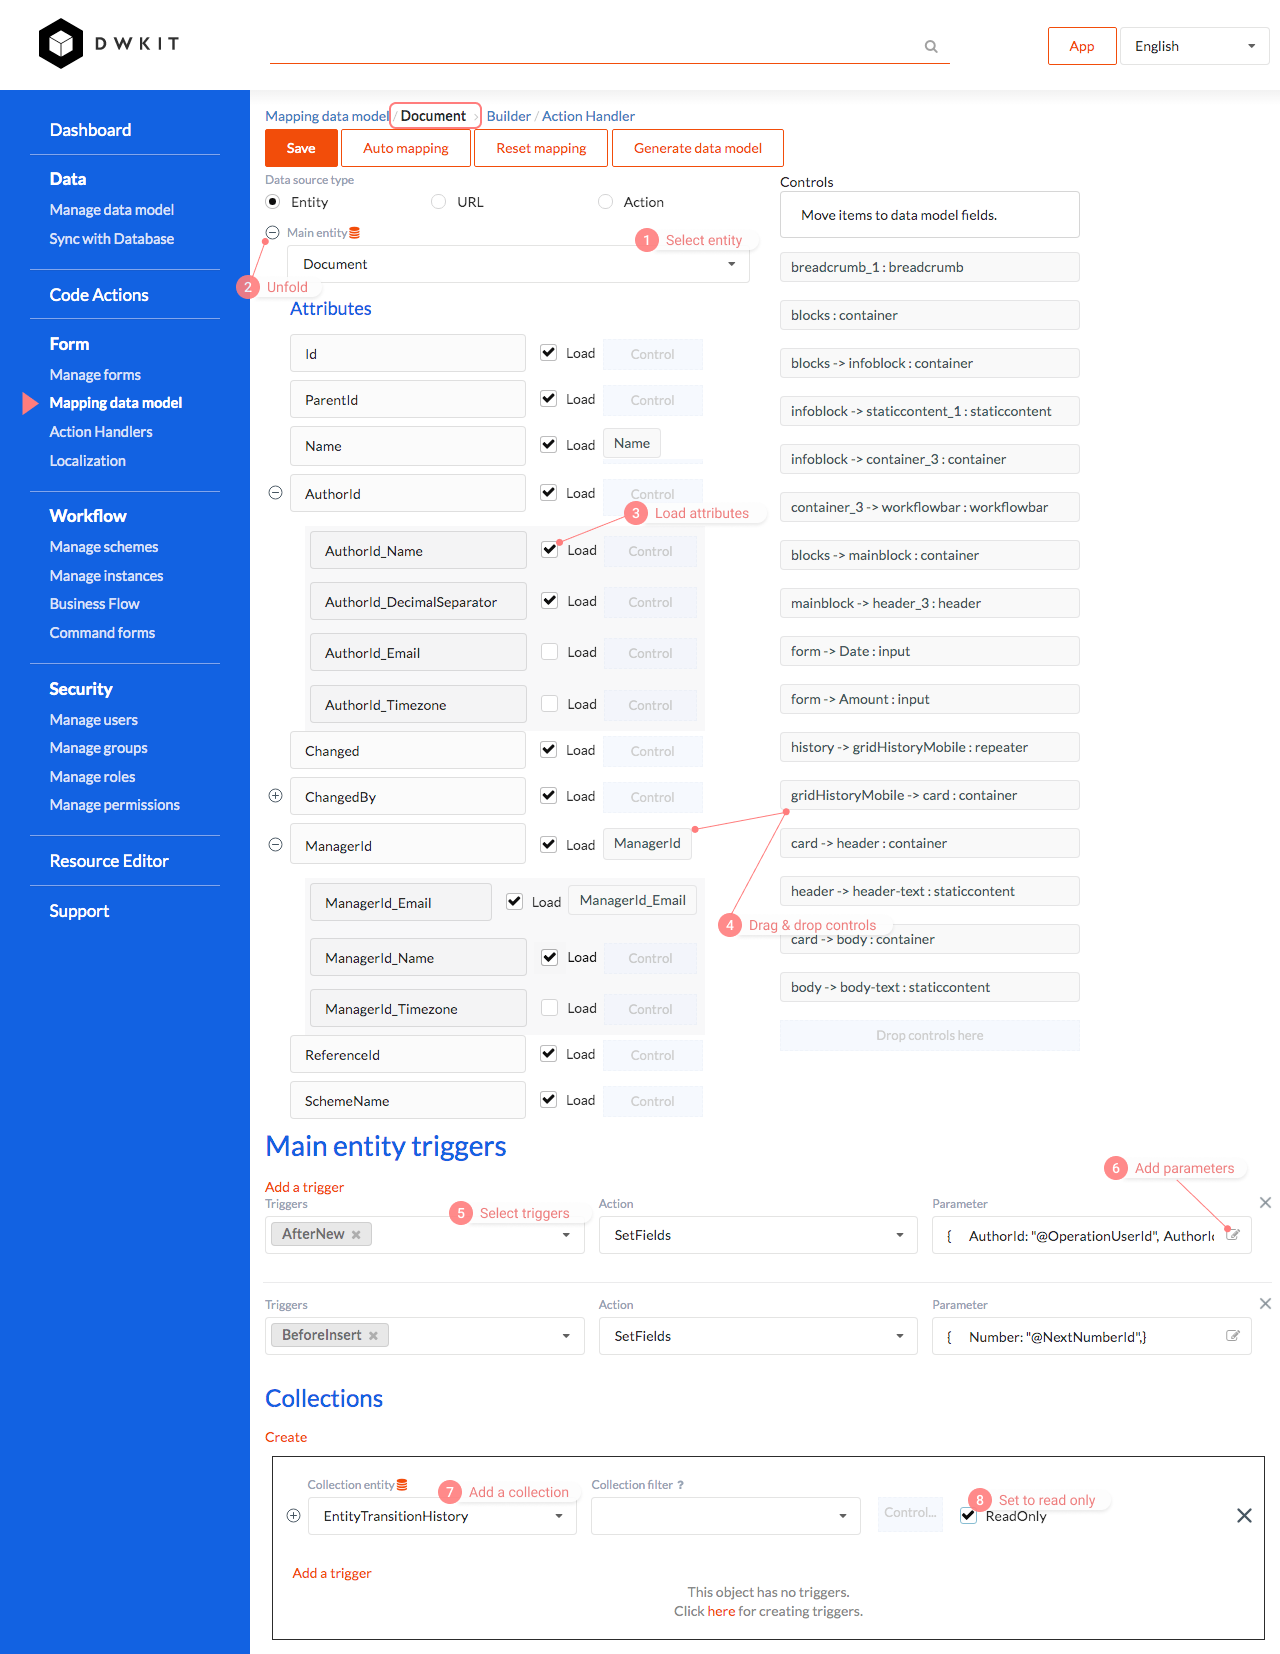
In Document, the Number field contains sequential numbers. We use the SetFields server action and the BeforeInsert trigger, with the
parameter specified so that the Number field is populated with incremental values, using the special variable @NextNumberId. You can read
more about the Server Actions and Triggers.
{
  Number: "@NextNumberId"
}
On creating a new document, we also arrange that the author, his name, the document status, and the current date in the Date field, should be set by default.
{
  AuthorId: "@OperationUserId",
  AuthorId_Name: "@OperationUserName",
  State: "@DefaultState",
  StateName: "@DefaultStateName",
  Date: "@DateTimeNow"
}
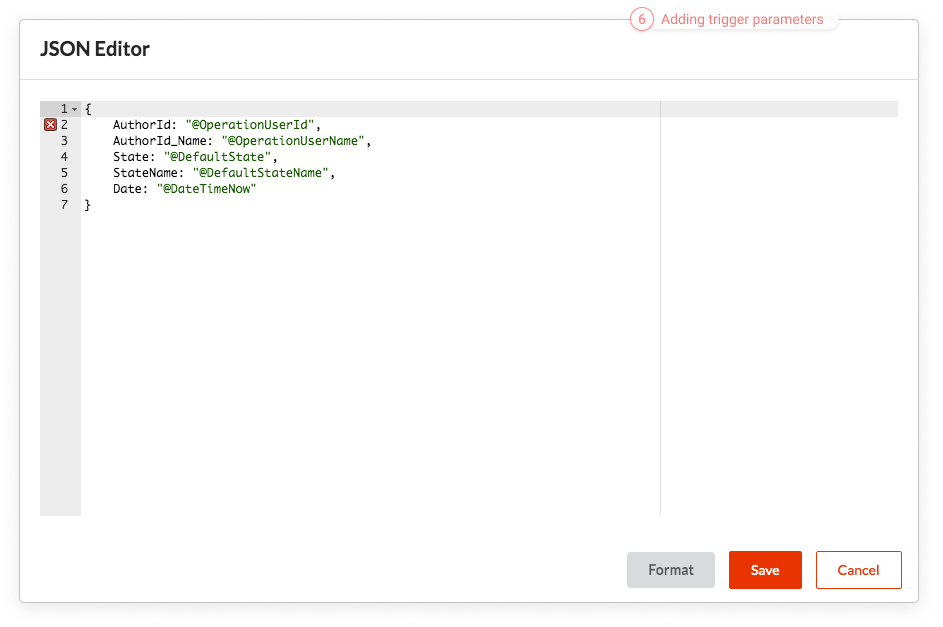
WorkflowPlugin we have enabled will monitor the further change of the State and StateName fields.
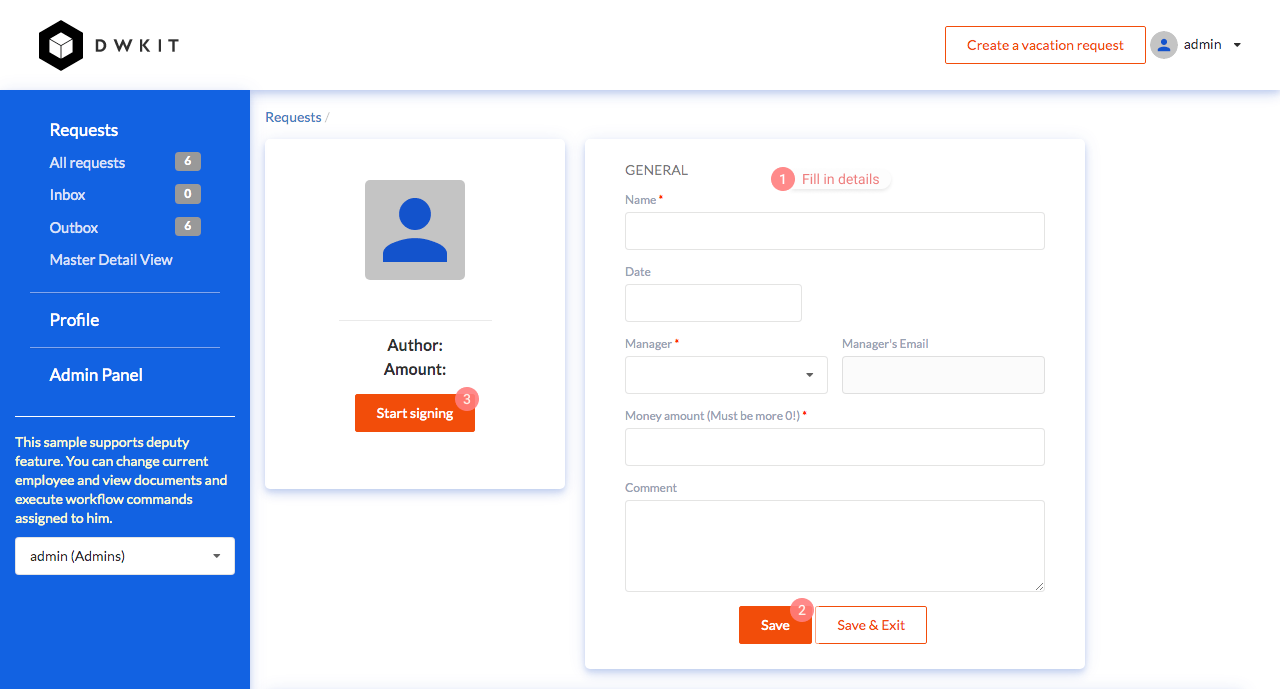
If you open the form and click the Save button, the required fields will be highlighted. This is how the client validation works.
If you fill in all the required fields and click the Save button, the document will be saved and the URL will change in the address bar of the browser. For example, at such http://localhost:48800/form/Document/ace2ef2e-dc13-0afb-7398-39f429966fb9. Here, 'Document' is the form name. 'ace2ef2e-dc13-0afb-7398-39f429966fb9' - Document's primary key value.
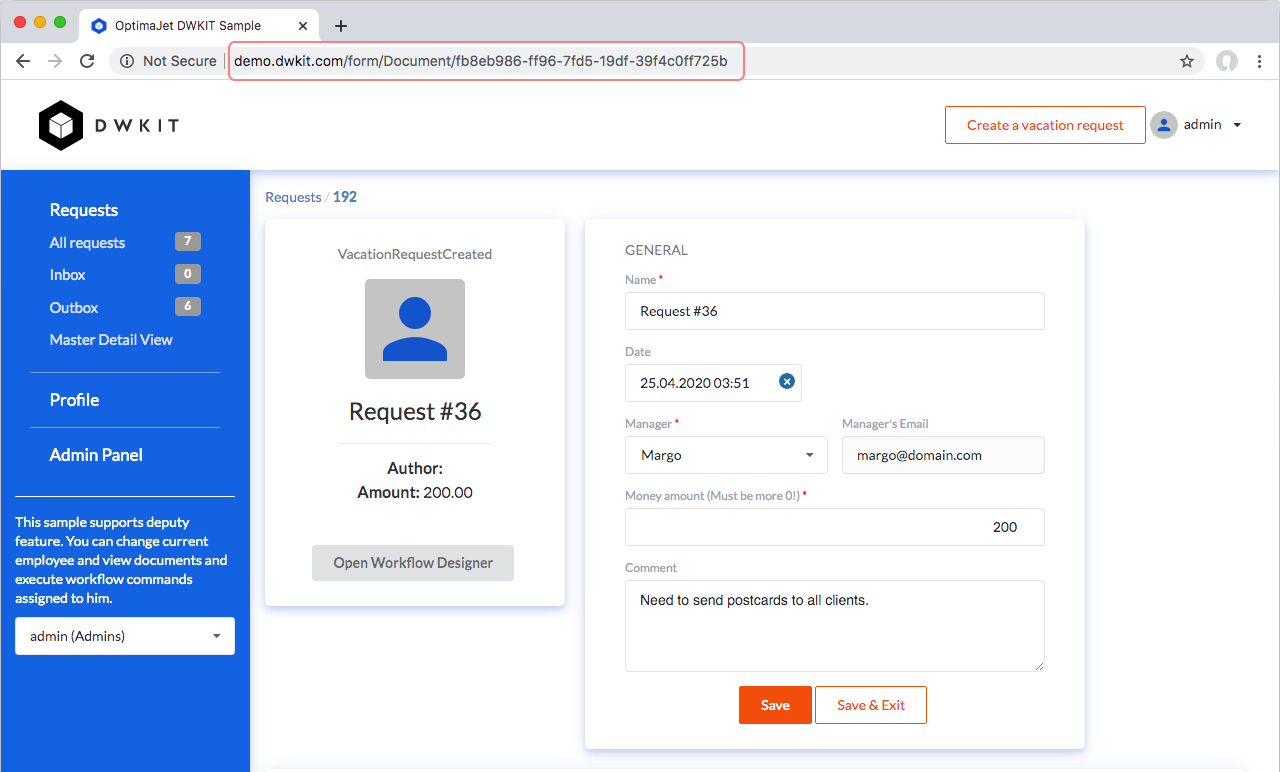
The form is also adaptive and fits a window on resize. Just change the width of the browser window to see how it works.
Step 5.3. Master-detail View
This type of form is useful to edit dictionaries. In these forms, the grid and the editing form are located on the same page.
The form for implementing Master-detail can be downloaded from here. The following points should be taken into consideration:
-
a grid of documents (docs) and an editing form (inside the form_1 container) are simultaneously used in this form;
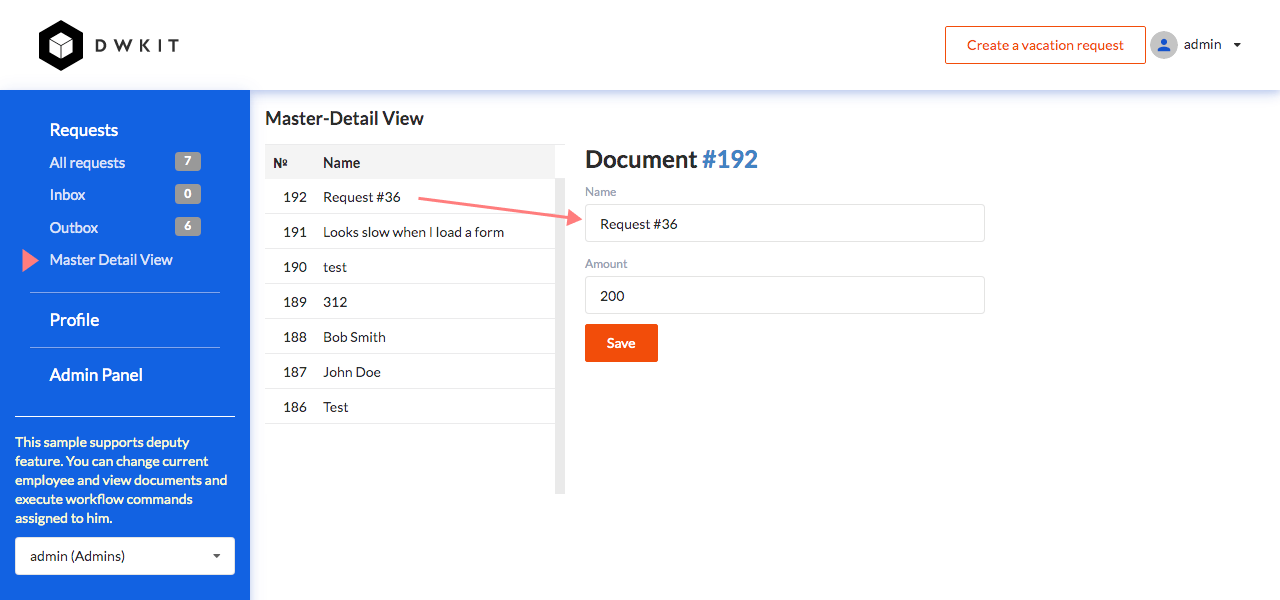
-
a click on a grid record will load this record into the editing form, because the onRowClick grid event triggers the predefined client action -
loadRecord;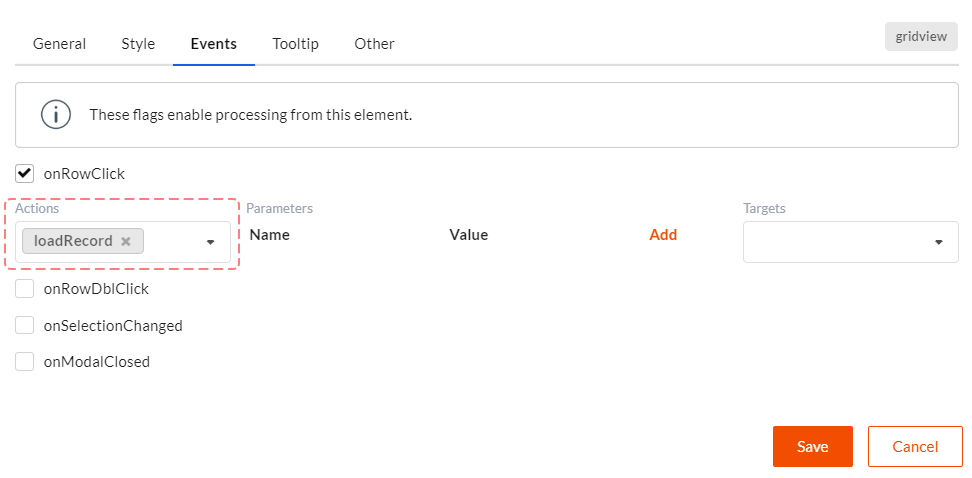
-
there is a Save button in the editing form, its onClick event triggers the following actions chain:
validate, save, gridRefresh- that is, the form is validated, saved and the grid data are updated.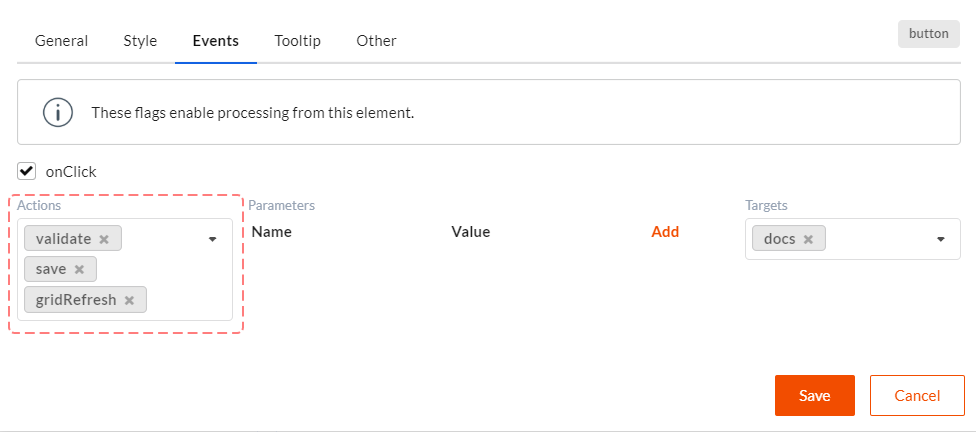
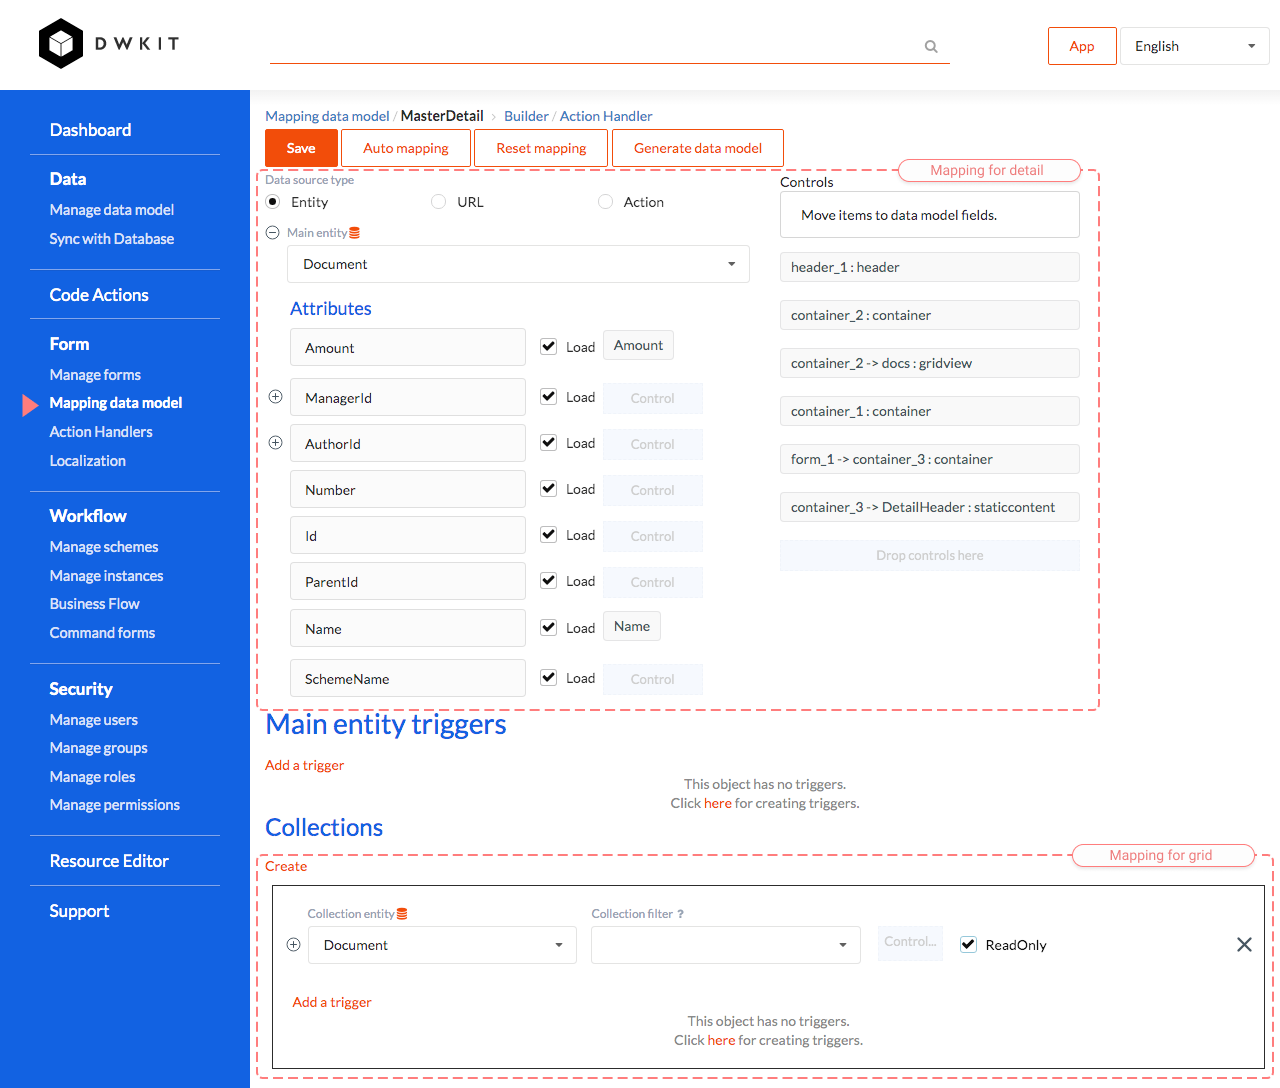
Also, this form has a somewhat unusual mapping with the data model. Go to the mapping page. Add an entry to Collections. Select the Document model, set the ReadOnly flag and associate it with the docs control. Now, the data from the Document model are pulled into the table. For the data to be pulled into the editing form, select the Document model in the Main Entity field and click Auto mapping. Save, go to Builder, click Open. In the form that opens, select the entry in the left grid, the editing form is displayed in the right grid. Change the data, click Save.
Step 5.4. Left Menu
All the DWKit menus are forms. An example of such a form can be downloaded from here. The form contains a menu control - sidebar_menu; the menu items are set as follows:
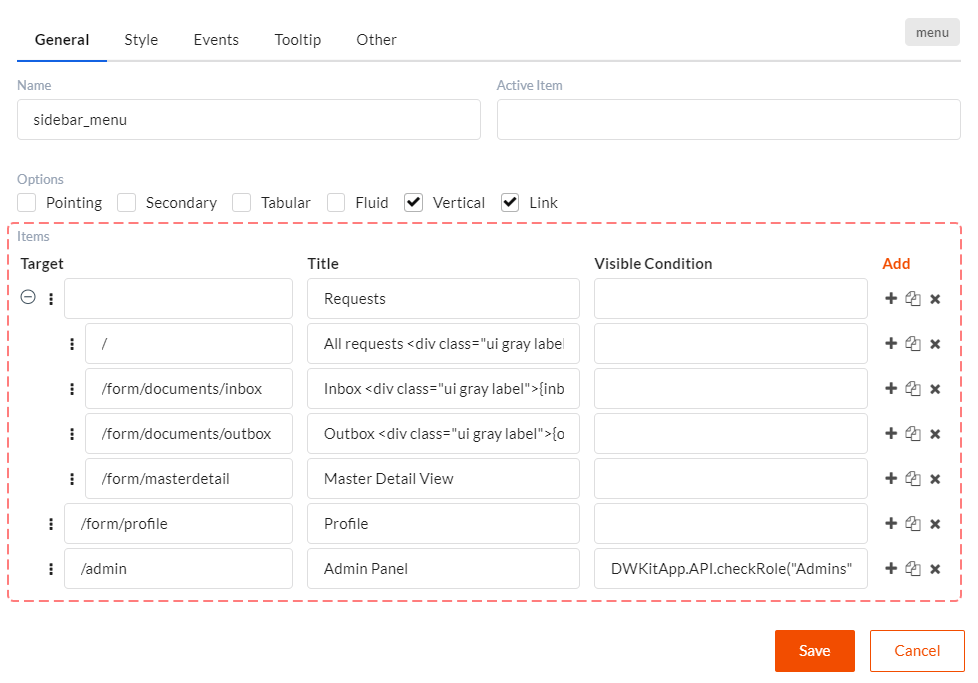
In the title, we can use HTML code; here, we apply substitutions. docount is the total number of documents from Notification Plugin. inbox and outbox are the counters for the documents of the user logged in, from Workflow Plugin.
To display the Admin Panel item, set the display condition DWKitApp.API.checkRole("Admins"). This item is only available for users with
the Admins role.
Step 6. Create Workflow Process
We are going to create a workflow process scheme in the scheme designer. Let the scheme be named VacationRequest.
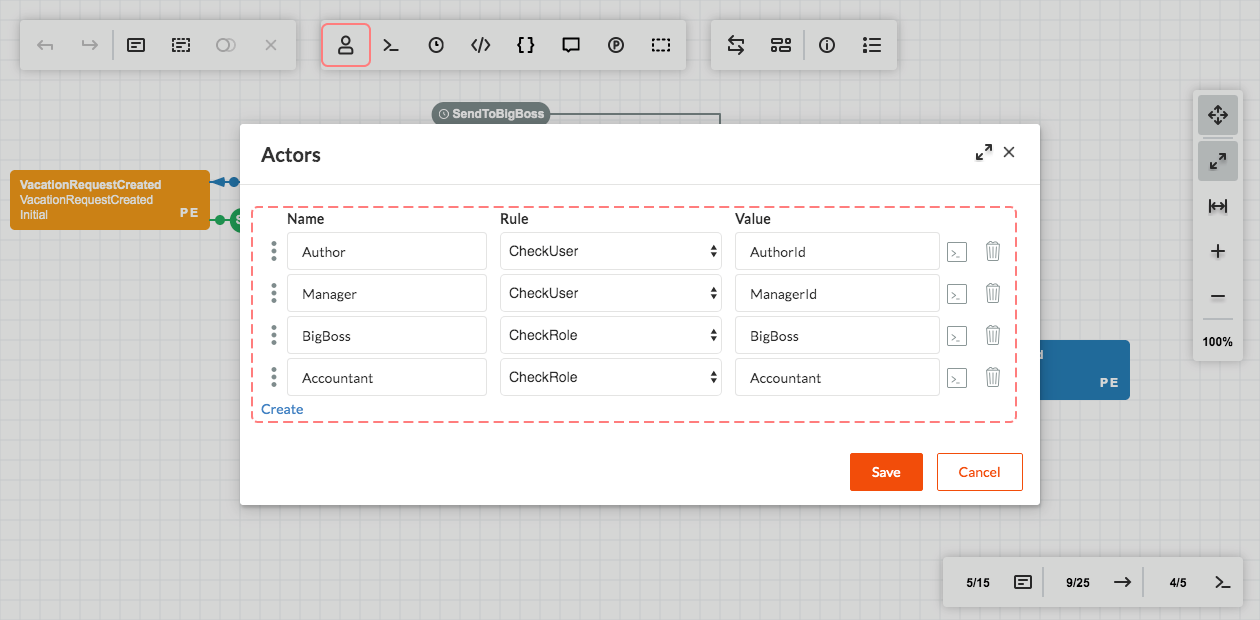
First, we create actors, some of them to check the roles, others to do with a specific user:
- Author - CheckUser - AuthorId
- Manager - CheckUser - ManagerId
- BigBoss - CheckRole - BigBoss
- Accountant - CheckRole - Accountant
CheckUser and CheckRole are the DWKit predefined authorization rules, added by Basic Plugin.
- CheckUser - checks if the current user ID matches the document attribute value (for example, AuthorId or ManagerId); if no such attribute, the check is performed by login or email.
- CheckRole – checks the user role.
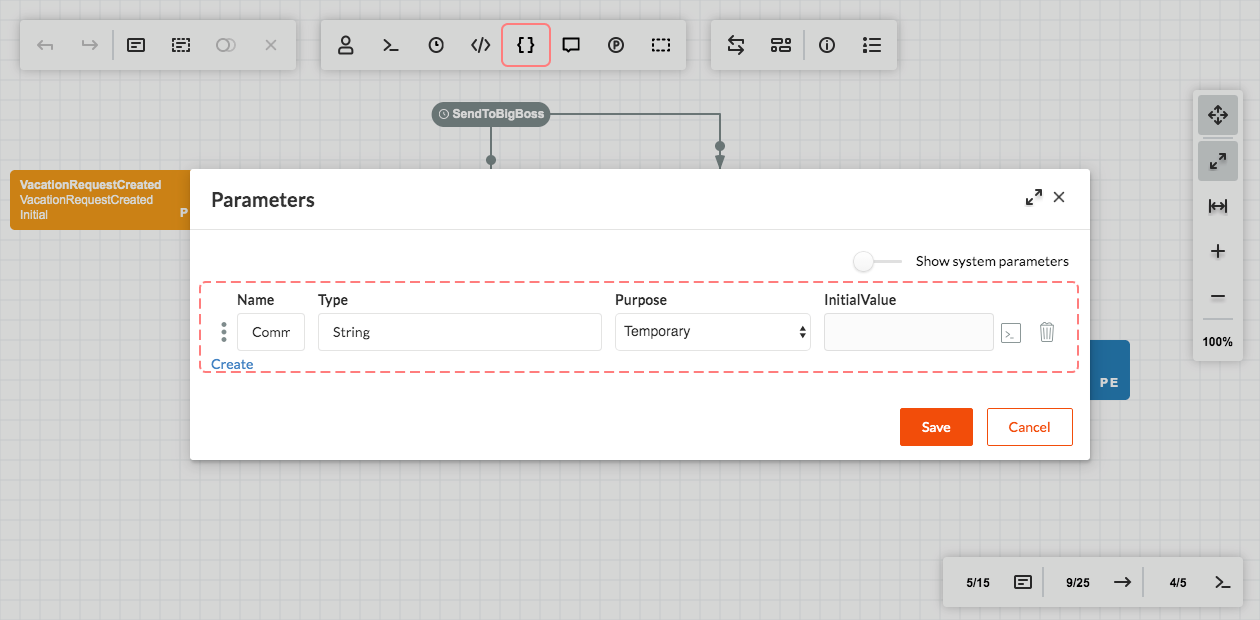
Create the process parameter named Comment.
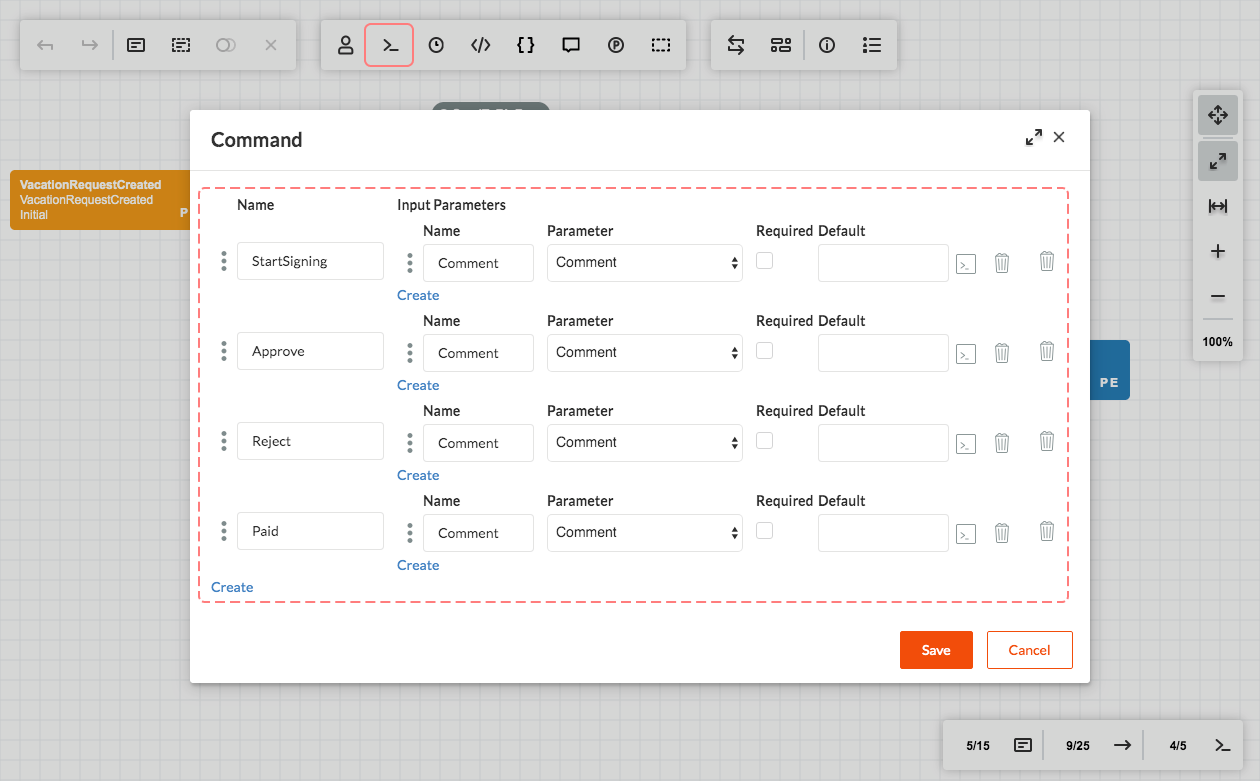
Create the commands:
- Start;
- Approve;
- Reject with the Comment parameter;
- Paid.
These commands are displayed as buttons in the editing form; and, having the access to these commands, the user will be able to approve or reject the document.
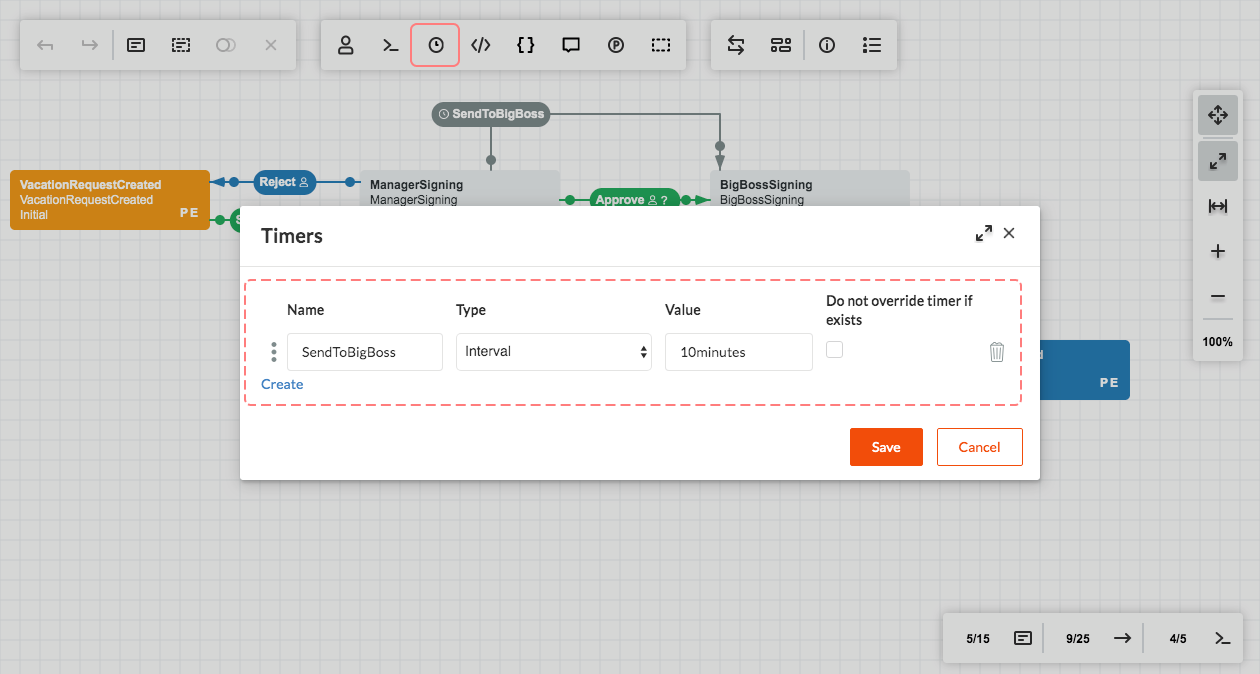
Create one timer.
- SendToBigBoss - Interval - 10minutes.
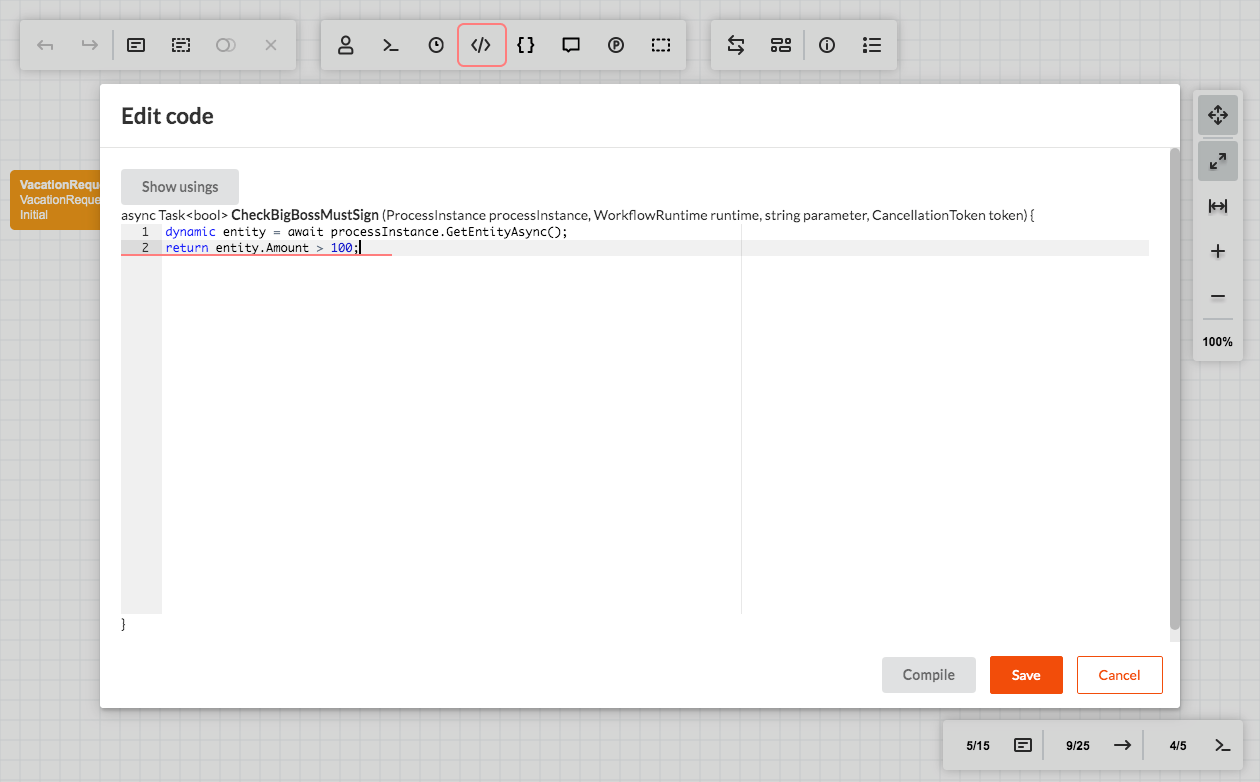
We should also create the condition called CheckBigBossMustSign to determine whether to send a document to a user with the BigBoss role
for signing. This condition can be directly set in the scheme, using
the CodeActions feature. The GetEntityAsync function returns the
current document record, and then you can add any conditions. In this case, we add the condition Amount> 100.
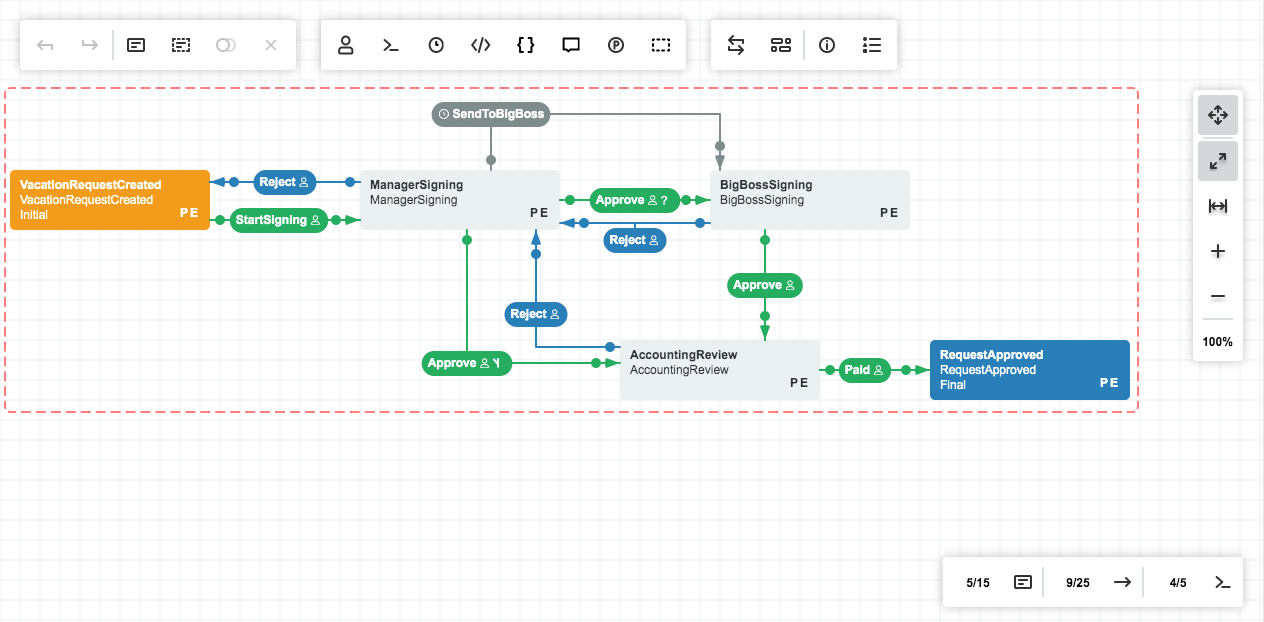
Next, we create the process scheme itself; its main elements are described in the following section. An example of a ready scheme can be downloaded from here.
Now, the process scheme is created. We should attach it to the form and create a form for a user to leave a comment if he rejects a document. How to bind the document editing form to the scheme, see in detail here. You should merely bind the DocumentEdit form and the VacationRequest scheme created before.
Create a simplest form with the comment input field and the Continue and Cancel buttons. Bind it to the VacationRequest process and the Reject command in the Command Forms interface. How to handle this, see in detail here.
We just created the workflow process and linked it to the document.
Application Testing
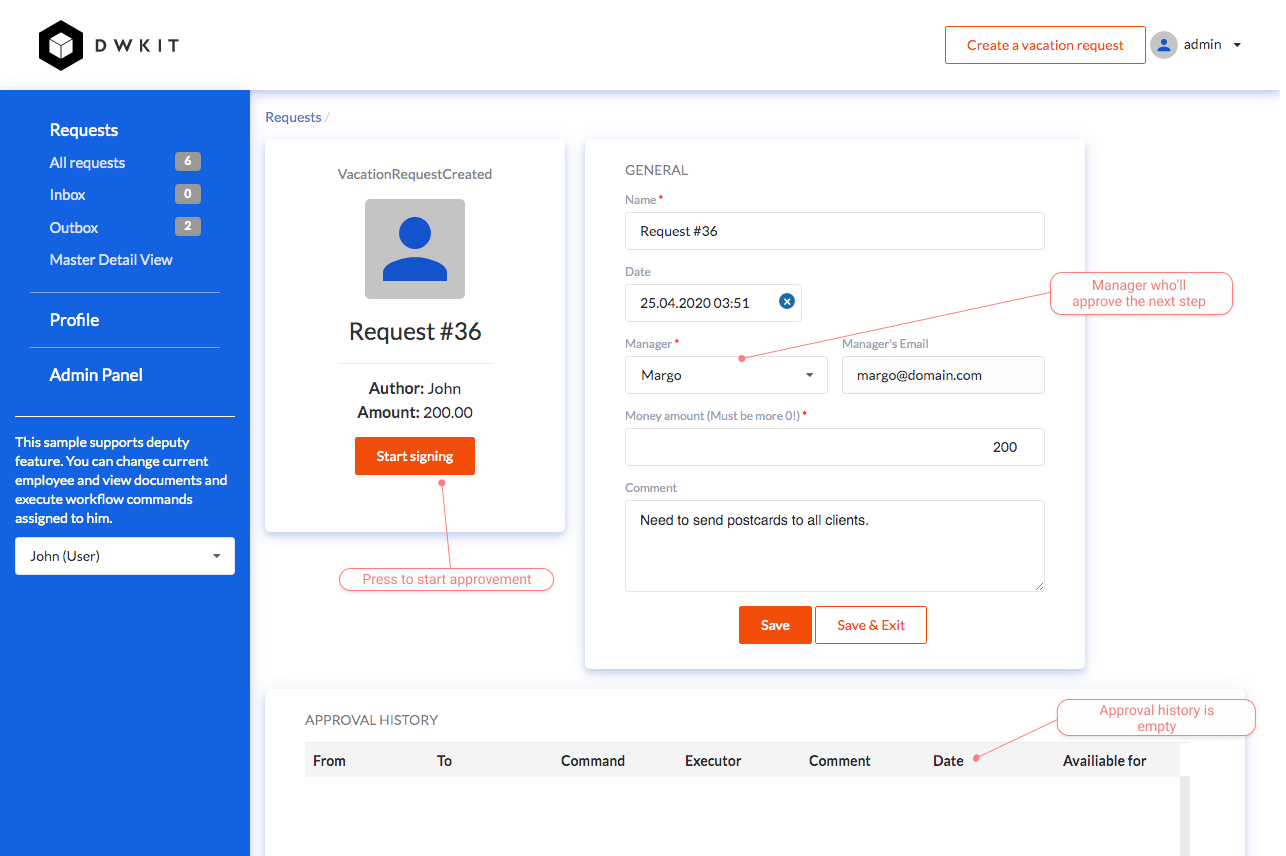
In the resulting application, we can view the whole list of the documents available in the system. Create a document.
Send it for signing. Push the Start Signing button to do it; StartSigning is the first command in the scheme.
Then, the manager sees the document in her inbox.
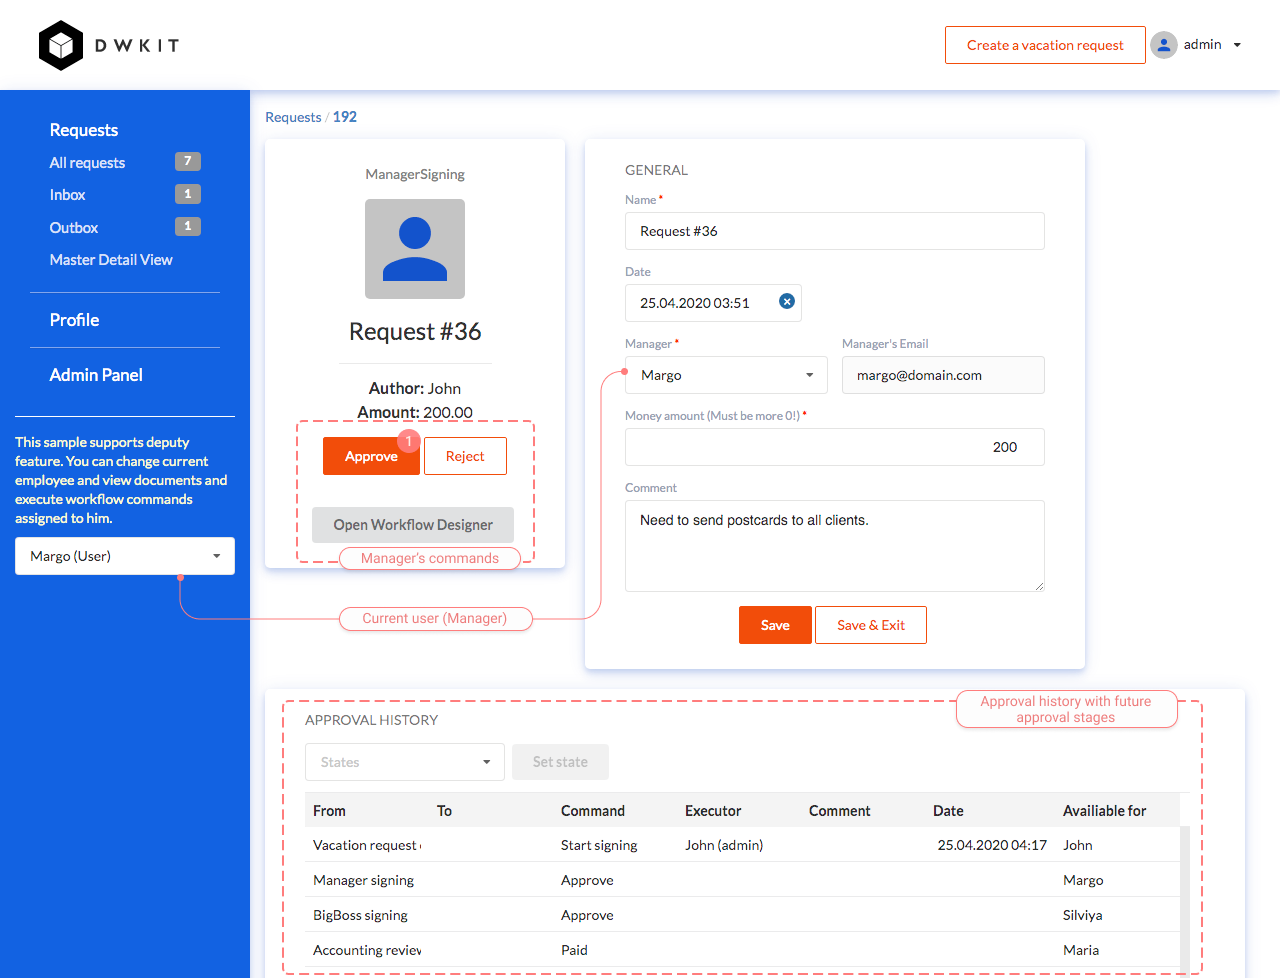
She can approve or reject the document.
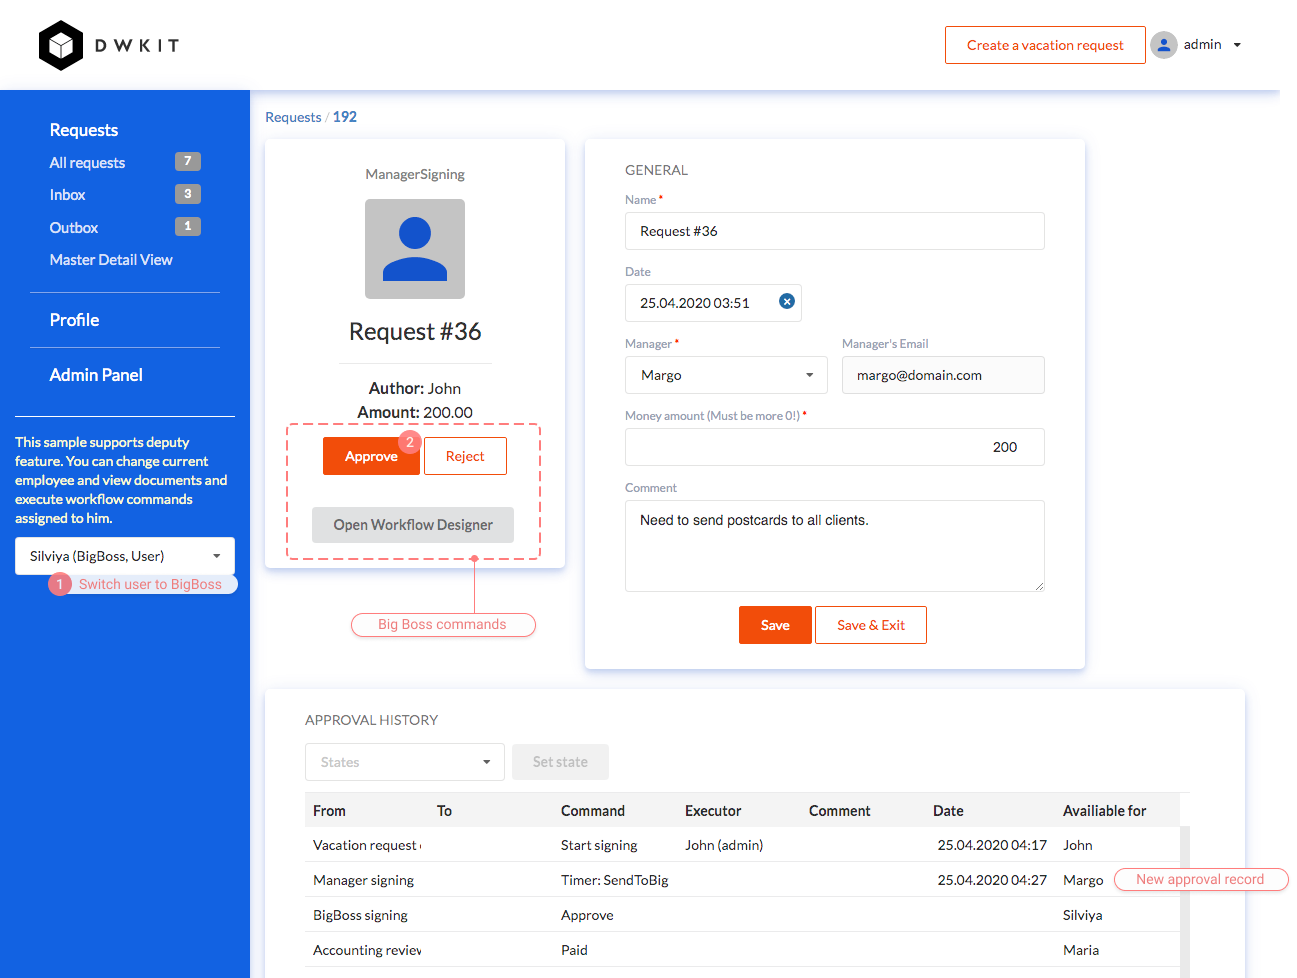
Since the document amount is set to be greater than 100, it will be sent for approval to a user with the BigBoss role. BigBoss can also approve or reject the document.
At the last stage, the document is sent to a user with the Accountant role. While moving along the path, the document fills in the approval history. Please, note that it displays the next steps assigned for the document in the future. Each step is processed by the built-in procedures.
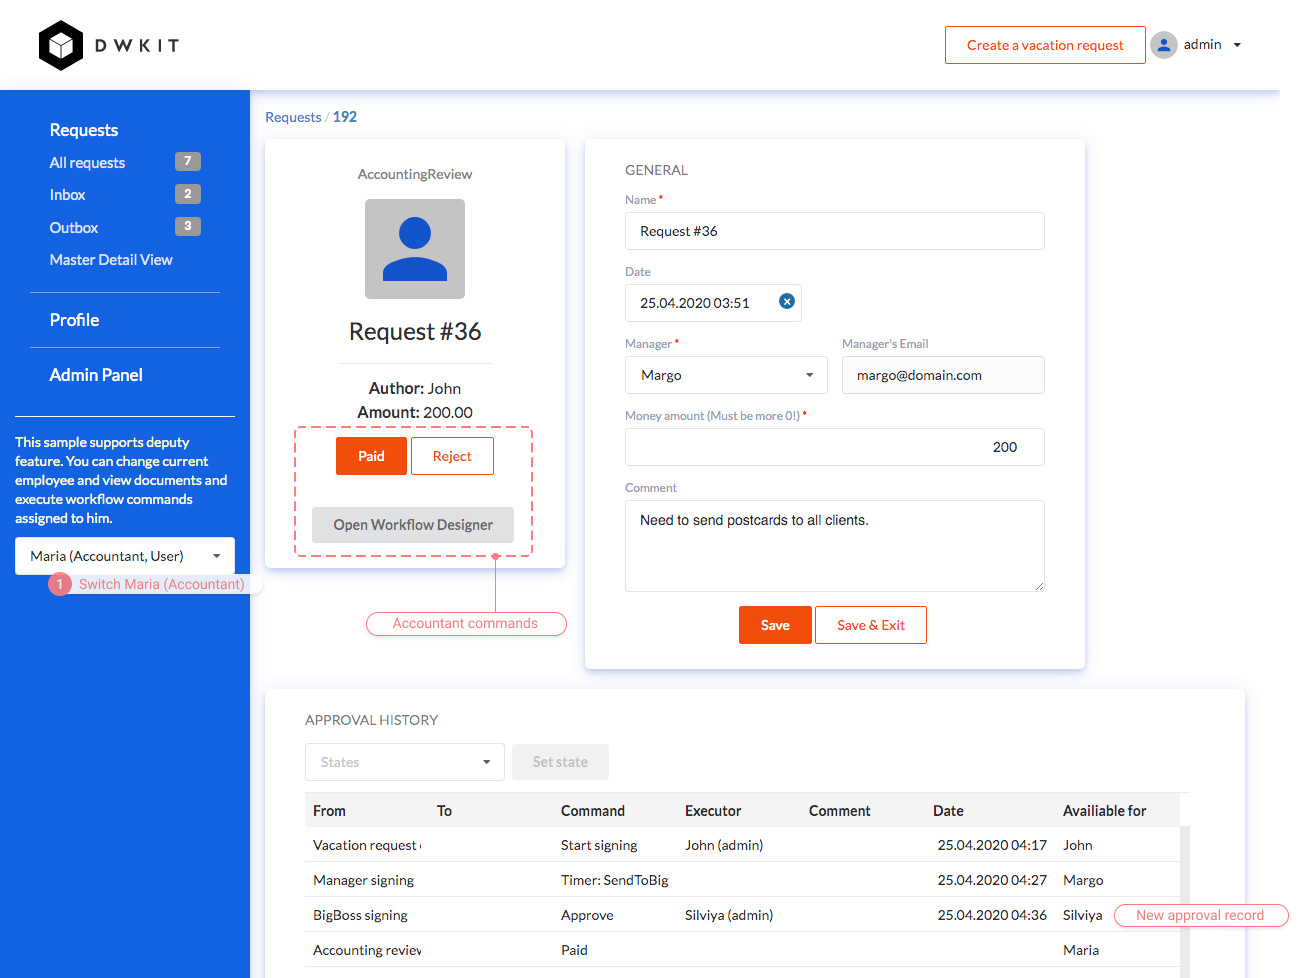
We have just created an application that is completely analogous to our demo example. While implementing the task, we have only written one simplest condition in the VacationRequest scheme and a bit of the client code for customizing the Documents grid.