Custom React components
In this section let's discuss how to create our own React component and connect it to Form Builder and DWKit app. Component code example is uploaded to GitHub. Let's examine this example step by step.
Step 1. Creating React component
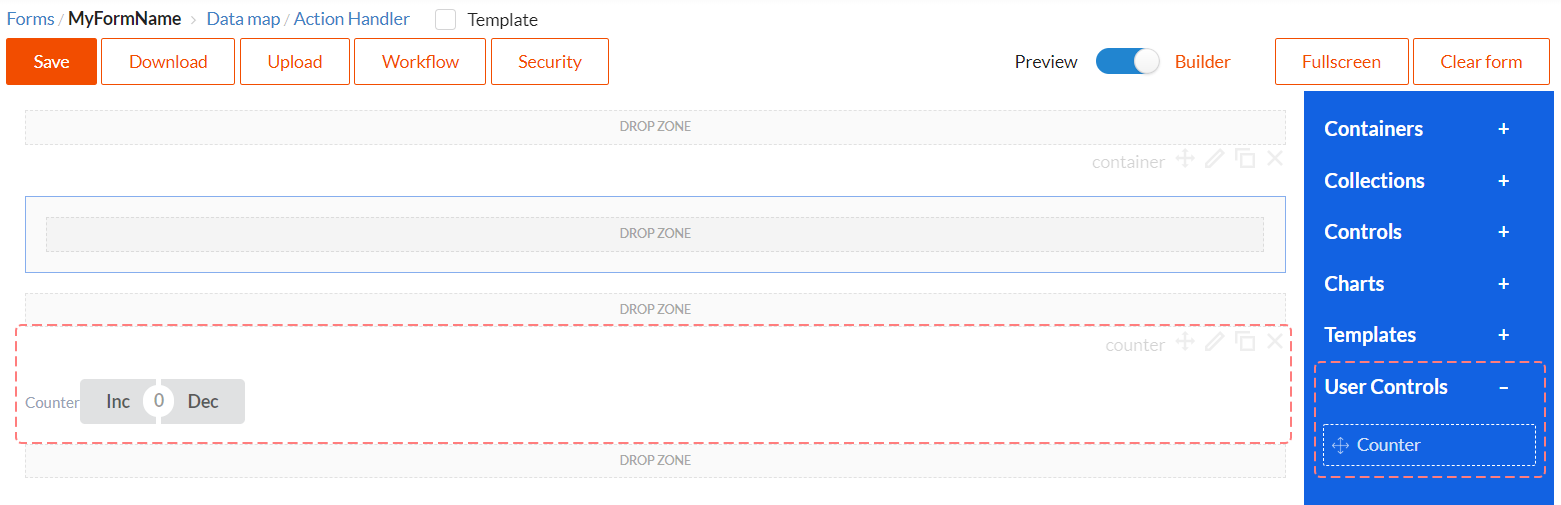
First let's write any React component we need. In our example we are working with Counter component which displays form data values and contains two buttons - to increase value by 1 and to decrease value by 1. This component can be linked to data and looks the following way:

Here's its code:
export class CounterControl extends React.Component {

    constructor(props) {
        super(props);
    }

    changeValue(e, newValue) {
        const props = this.props;
        if (props.handleEvent) {
            props.handleEvent({syntheticEvent: e, key: props.name, eventName: "onChange", name: props.name, value: newValue});
        }
    }

    onInc = (e) => {
        this.changeValue(e, this.getValue() + 1);
    }

    onDec = (e) => {
        this.changeValue(e, this.getValue() - 1);
    }

    getValue() {
        const data = this.props.data;
        if (!data) return 0;
        return data[this.props.name] ? data[this.props.name] : 0;
    }

    render() {
        const label = this.props.label ? <label>{this.props.label}</label> : null;

        return (
            <div className="field">
                {label}
                <Button.Group>
                    <Button content={this.props.incButtonText} onClick={this.onInc}/>
                    <Button.Or text={this.getValue()}/>
                    <Button content={this.props.decButtonText} onClick={this.onDec}/>
                </Button.Group>
            </div>
        );
    }
}
You can see that it's a very simple component. But it is most essential to understand how data binding works in this case.
-
Component receives all form data in its
dataproperty. If there is a property which name coincides with componentprops.name( i.e. component name) indata, this is the data component will display. The code is as follows:getValue() {
const data = this.props.data;
return data ? data[this.props.name] : 0;
} -
When changing data component must send
onChangeevent to DWKit, in which it transfers its new value and name (props.name). When connecting component to DWKit, the function which is responsible for sending events to DWKit is available. It is calledprops.handleEvent. Here's the code:changeValue(e, newValue) {
const props = this.props;
if (props.handleEvent) {
props.handleEvent({ syntheticEvent: e, key: props.name, eventName: "onChange", name: props.name, value: newValue });
}
}
Thus, this component will work with DWKit data binding.
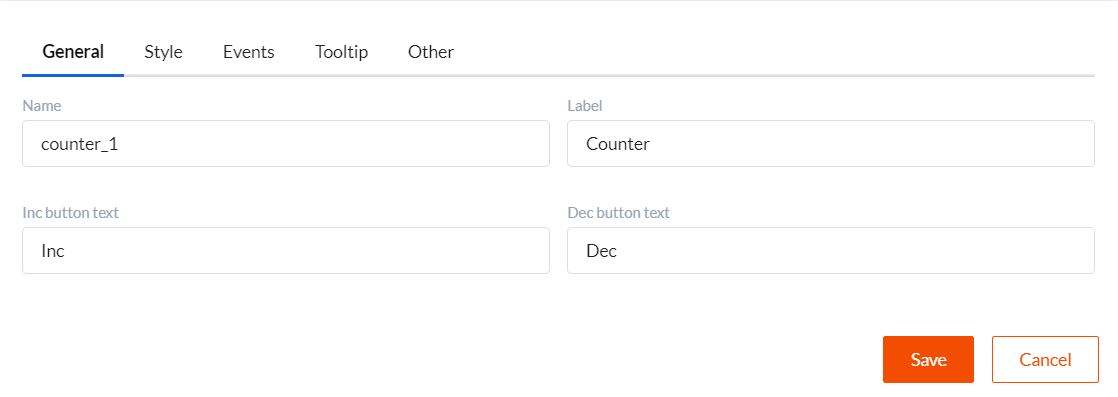
Step 2. Creating form for editing component properties
As we have discussed before, form for editing component properties is drawn for each component in Form Builder. We need to create a component which will draw General tab in this form and return a list of events for the Events tab. Its code is also very simple, you can check it out below or on GitHub.
export class CounterEditControl extends BaseEditControl {

    constructor(props) {
        super(props);
    }

    getGeneralDescription() {
        const data = this.props.data;
        const handleChange = this.props.parent.handleChange.bind(this.props.parent);

        return (<Form>
            <Form.Group widths="equal">
                <Form.Input name="key" label="Name" value={data.key} onChange={handleChange}/>
                <Form.Input name="label" label="Label" value={data.label} onChange={handleChange}/>
            </Form.Group>
            <Form.Group widths="equal">
                <Form.Input name="incButtonText" label="Inc button text" value={data.incButtonText} onChange={handleChange}/>
                <Form.Input name="decButtonText" label="Dec button text" value={data.decButtonText} onChange={handleChange}/>
            </Form.Group>
        </Form>);
    }

    getEventsList() {
        return ["onChange"];
    }
}
Let us draw your attention to the following two aspects:
-
getGeneralDescriptionfunction returns a form which will be displayed in General tab. You can edit the followingCounterControlcomponent properties in this form: Name, Label, Inc button text and Dec button text. Note thatnameproperty values for inputs in this form are similar withCounterControlcomponent props. I.e.:-
set
labelproperty with the following code:<Form.Input name="label" label="Label" value={data.label} onChange={handleChange} />and then get its value in the
CounterControlcomponent:const label = this.props.label; -
set
Inc button textproperty with the following code:<Form.Input name="incButtonText" label="Inc button text" value={data.incButtonText} onChange={handleChange} />and then get its value in the
CounterControlcomponent:<Button content={this.props.incButtonText} onClick={this.onInc} />
etc.
-
-
getEventsListfunction returns a list of events that can send the component.
General tab appearance is shown on the picture below.
Step 3. Creating component renderer function
Renderer function is necessary for our Form Builder component to render component in form. Here it is on GitHub. This function solves to important problems:
- It adapts a lot of Form Builder parameters to props of our manually written component.
- Renders a component.
it is presumed that there is only one custom component renderer function in the application, and you just change it when adding new custom components.
export default function renderControls(parentComponent, control,
                                       {
                                           model, data, errors,
                                           parentItem,
                                           buildermode, children,
                                           handleEvent, getAdditionalDataForControl,
                                           readOnlyControls, readOnly,
                                           disableRefs,
                                           uploadUrl, downloadUrl, extendedData,
                                           controlsToReplace, needCheckReplace,
                                           eventOnEdit, eventOnDelete, eventOnCopy
                                       }) {

    const props = {
        key: model.key,
        name: model.key,
        "data-buildertype": model["data-buildertype"]
    };

    if (control === CounterControl) {
        props.incButtonText = model.incButtonText;
        props.decButtonText = model.decButtonText;
        props.label = model.label;
        props.handleEvent = handleEvent;
        props.data = data;

        return (<CounterControl {...props} />);
    }
    return null;
}
Form Builder passes lots of parameters into this function. It is necessary because some DWKit components are rather complicated. But we will talk only about several renderer function parameters:
model- component settings. This is what we set in component property edit form in Form Builder.control- defines which component will be drawn.handleEvent- DWKit function using which component sends events.data- form data object.
Step 4. Creating a Custom React components list for Form builder
Now you need to create a list of your Custom components, so that Form Builder could draw it in the components panel. Here it is on GitHub. There can be only one such list and all further custom components should be added to it.
const customControls = [
    {key: "externalControls", title: 'User Controls', isseparate: true, defaultopen: true},
    {
        key: "counter",
        title: 'Counter',
        control: CounterControl,
        editControl: CounterEditControl,
        defaultValues: {label: "Counter", incButtonText: "Inc", decButtonText: "Dec"}
    }
];
The first element in this list describes the section to which the components described below will be added. Second element binds Custom
component - control: CounterControl with form for editing properties - editControl: CounterEditControl. Here you can also set default
property values - defaultValues.
Next we need to transmit info about our custom components into the admin and DWKit app. To do that, change admin.jsx and app.jsx files. They are usually found at this path: /OptimaJet.DWKit.StarterApplication/wwwroot/js/app/.
Step 5. Connecting component to admin panel (admin.jsx)
We must transmit renderer function and custom components list into <DWKitAdmin/> React component.
import renderControls from './controls/controlrenderer';
import customControls from './controls/controlslist';

//...
render(
    <DWKitAdmin
        //...
        externalControlList={customControls}
        externalControlRender={renderControls}
        //externalControlsOnly
    />,
    document.getElementById('content')
);
If you want Form Builder to display only external custom controls, set externalControlRender property for <DWKitAdmin/> component.
Full code of modified admin.jsx can be found
on GitHub.
Step 6. Connecting component to DWKit application (app.jsx)
We must transmit renderer function and Custom components list into <DWKitForm/> React component. However, we can't do it directly, but
via window global object.
import renderControls from './controls/controlrenderer';
import customControls from './controls/controlslist';

...
window.DWKitFormSettings = {
    externalControlList: customControls,
    externalControlRender: renderControls
};
...
Full code of modified app.jsx can be found
on GitHub.
Step 7. Repacking DWKit client side
After all changes have been applied, you'll need to repack DWKit client side. Use webpack to do that. Open the following path when executing commands below (this is where webpack.config.js file is located): /OptimaJet.DWKit.StarterApplication/.
-
If your webpack is installed globally, it must be webpack 4. We do not recommend this option, as you might have several applications packed by different versions of webpack, and webpack versions are not compatible. Let's activate the following commands:
npm install
webpack --env.prod -
we recommend to use webpack installed via npm, as this is the most correct version.
npm install
node_modules\.bin\webpack --env.prod
Now you can use your external components in Form Builder and DWKit app. See the result of our labor.